

The thought of using a paint brush to hand paint the details on a 1/48th scale instrument panel has just never appealed to me. I am assuming I could do a decent job, but maybe I just lack the patience for that work. Kit supplied decals for the instrument panels, at least for me, have never quite looked the part.
So, thank goodness for Eduard, and other companies, that continue to provide innovative products to help modelers increase the level of detail and realism of model cockpits. This will be a quick comparison of Eduard’s photoetch, LooK, and Space instrument panels for Eduard’s 1/48 P-51D Mustang.
Eduard’s Pre-Painted Photo Etch Instrument Panel: My first experience with a photo etch instrument panel came from Eduard’s photo etch set for Academy’s 1/72 Consolidated PBY-5A “Black Cat” Catalina kit. It was an unpainted brass instrument panel front and a clear piece of acetate with the dial faces painted on. I painted the brass front black and sealed it with clear coat, and then sandwiched the clear acetate between the painted instrument panel front and a white piece of plastic card stock cut to the shape of the instrument panel. It was finished with a small drop of Microscale Industries Micro Kristal Klear in each dial to simulate the glass. It was definitely a step up in appearance from just slapping the kit supplied decal on the instrument panel kit piece.
Now we have exquisitely pre-painted photo etch frets that come with all of the pieces to make a highly detailed instrument panel. The main portion of Eduard’s photo etch instrument panel in their P-51D Mustang kit comes in three pieces that are sandwiched together. Eduard has developed the technology to simulate the glass covering the dials on the middle piece so that you no longer need to use Micro Kristal Klear to simulate the glass. Very nice touch. Eduard’s photo etch frets that come in the Profipack boxings also come with seat belts, other cockpit pieces, and some exterior pieces.

The downside to using these pre-painted photo etch sets is that there are numerous small pieces that are difficult to handle and to get in place. Although I enjoy using photo-etch update sets, the smaller pieces can really test one’s patience.

Eduard’s LooK Instrument Panel: Eduard’s “LooK” instrument panels are cast in black resin with colour printed dials, bezels, switches, knobs and more. The benefit of these products is that they take very little time to separate from their casting block, clean-up and assemble. No painting, no little photo etch parts to attach, and they are drop fit replacement parts for whatever kit they are made for. The standard LooK package also come with Eduard’s pre-painted steel seatbelts. Eduard also produces a LooK Plus version that comes with resin pieces such as exhaust stacks, tires, etc. . .


Eduard’s Space Instrument Panel: The Eduard Space product line are 3D instrument panels on decal sheets. These are decals that show actual relief of the instrument dial bezels, switches, toggles, etc . . . The sets not only come with the instrument panels, but also other cockpit details, and a fret of photo etch seat belt parts and levers.
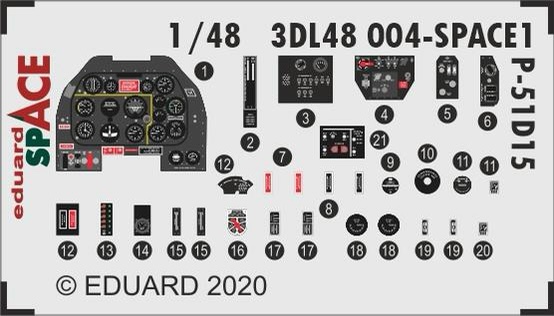
Do not soak or submerse the decals in water for very long as this will cause the decals to swell and distort. Eduard has provided a short article on how to apply the 3-D decals in their March 2021 edition of Info Eduard. The article can be found here: https://www.eduard.com/out/media/InfoEduard/archive/2021/info-eduard-2021-03eng-2.pdf.

Below are the finished instrument panels with the photo etch instrument panel on the left, the LooK instrument panel in the middle, and Space instrument panel on the right. All three look very nice.
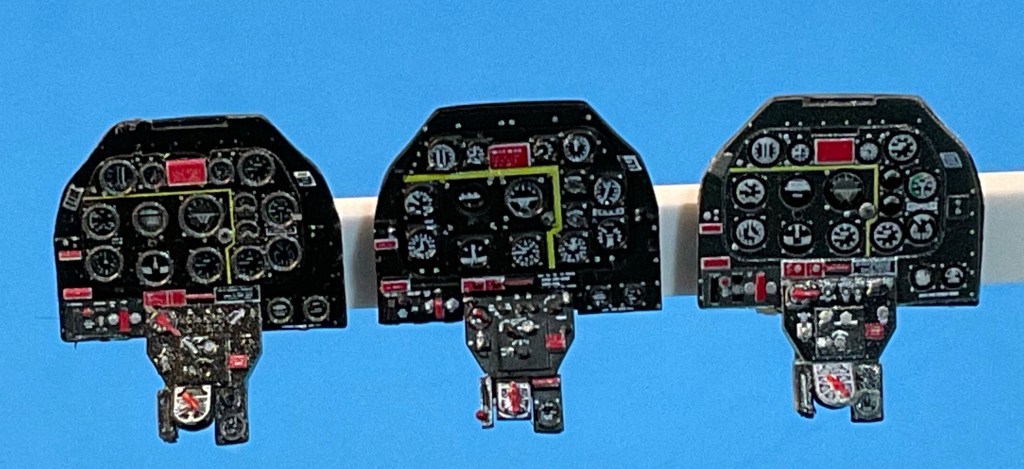
My preference is the photo etch instrument panel due to the quality of the bezels around the instrument dials. To me, they just make the photo etch instrument panel more realistic, but I would have no problem using either the LooK or Space instrument panels. The Space instrument panel took about the same amount of time to create as the photo etch instrument panel did. If you are looking for a great looking instrument panel with the least amount of work, then the LooK instrument panel is your choice.
Comments regarding what your preferences are, and your likes and dislikes about these products are welcome!
Kudos to Eduard for continuing all three product lines, and giving modelers choices. I highly recommend all three products.
Next up: A review of new decals for 457th Fighter Squadron, 506th Fighter Group Mustangs from UpRise Decals.


