Kit Review: Arma Hobby’s 1/72 P-51D Mustang Very Long Range (Kit No. 70073)

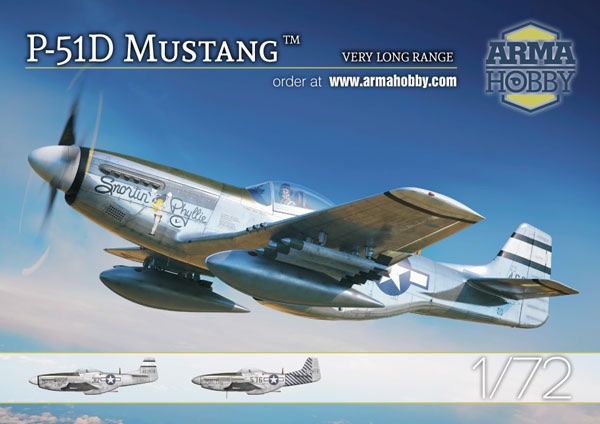
Arma Hobby recently released an Iwo Jima VLR Mustang boxing of their popular 1/72 North American P-51D Mustang kit. It was released in mid-May 2026, and is now making its way into US online retail hobby stores. The box art is striking with a 21st FG VLR Mustang loaded out with 165 gallon drop tanks and six HVAR rockets. Very cool!
Arma Hobby

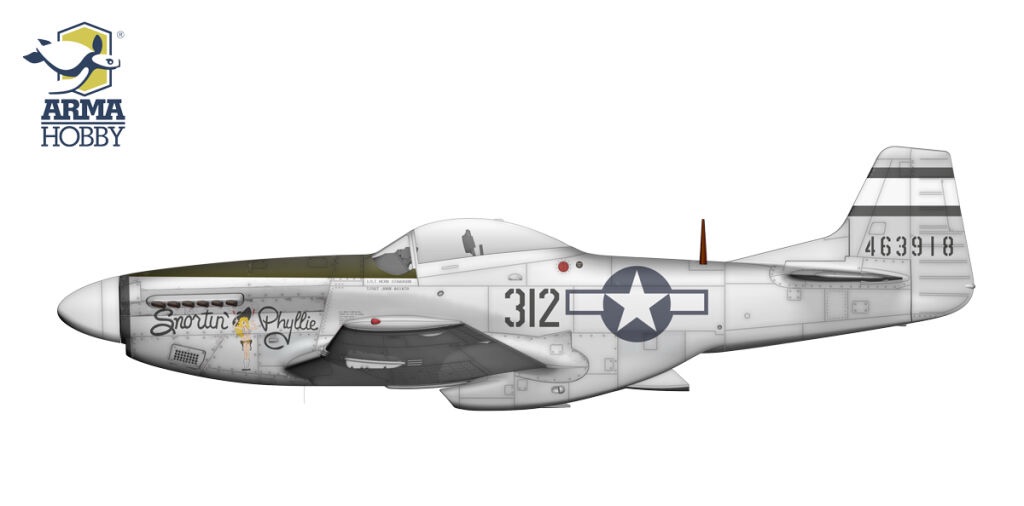
There are two decal options. The first is a 531st FS, 21st FG P-51D-20 NA (Serial No. 44-63918) 312 Snortin’ Phyllie flown by 1st Lt. Herbert Straughn. Nice to see a decal option for a 531st FS Mustang other than Major Harry Crim’s 300 My Achin’ Ass.
Arma Hobby

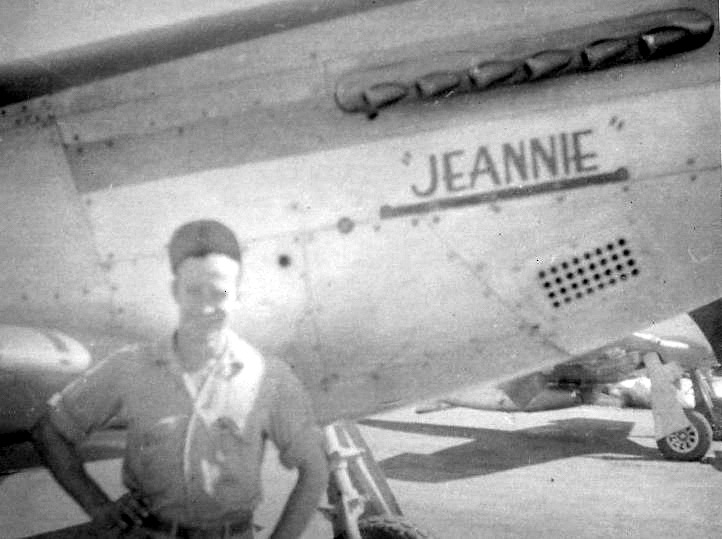
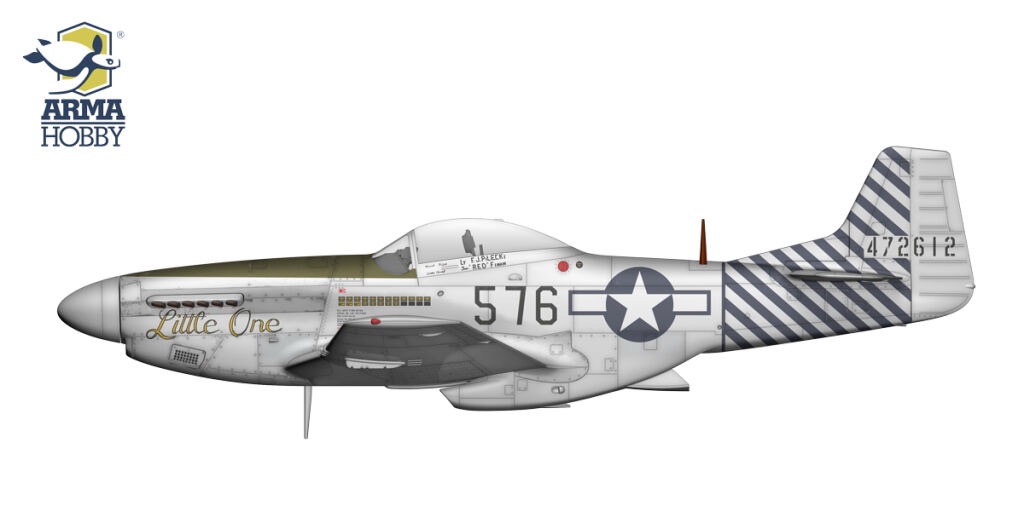
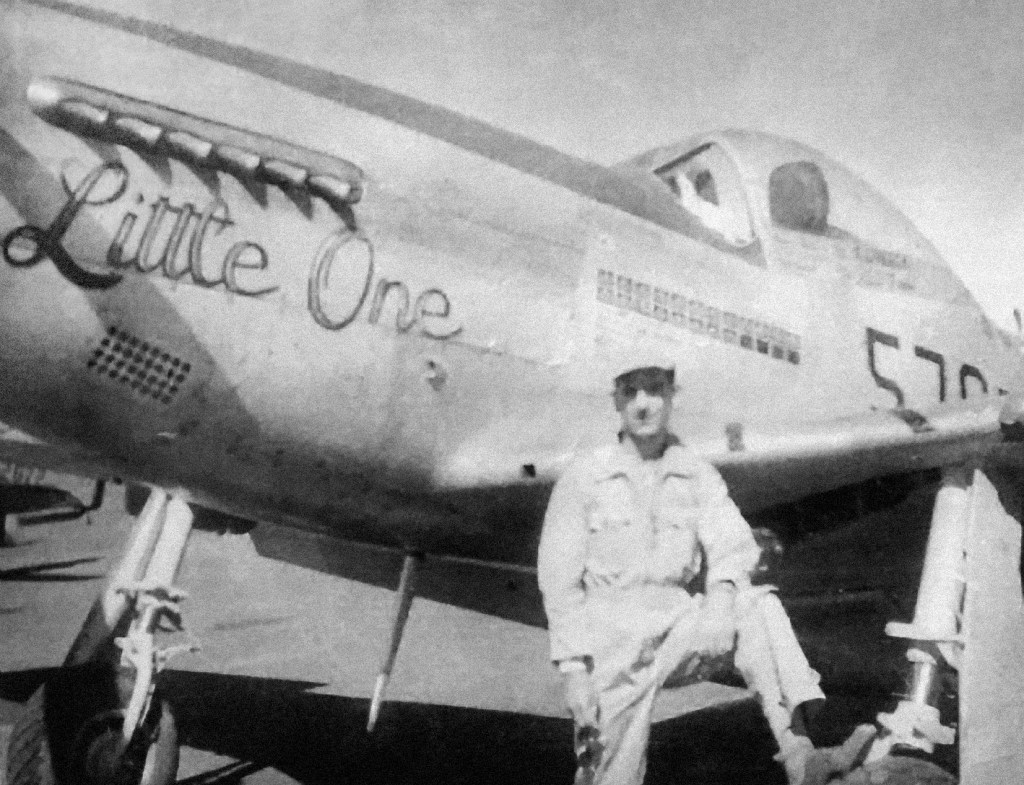
The second decal option is a 458th FS, 506th FG P-51D-25 NA (Serial No. 44-72612) 576 Little One/Jeannie assigned to 1st Lt. Max E. Ruble and 2nd Lt. Francis J. Pilecki. On June 10, 1945, 1st Lt. Ruble was credited with shooting down a Mitsubishi JM2 Raiden.
Arma Hobby

Again, thanks to Arma Hobby for providing two decal options not seen in other kits, and not well covered by after market decal manufacturers (decals for 576 Little One/Jeannie are provided in all three scales on the decal sheet which comes with the book: 506th Fighter Group: The History of the 506th Fighter Group, Iwo Jima 1945 by Robert Grant). This book is published by AJ Press as part of their Fighting Units in Color series. My review of this book can be found here: https://iwojimamodels.com/2019/12/14/book-review-506th-fighter-group-the-history-of-the-506th-fighter-group-iwo-jima-1945-by-robert-j-grant/

On to the sprues. Arma Hobby’s original release of its 1/72 P-51D Mustang (Kit No. 70070) contained three sprues; two molded in light gray plastic (A & B), and one in clear plastic (T) for the canopies and other clear parts. The Very Long Range boxing includes an additional sprue for the 110 and 165 gallon drop tanks, sway braces, and HVAR rockets. As can be seen from a review of the sprues, you can build any variant of the D model from the D-5 to the D-25 from this kit.

The first sprue (A) consists of the wings, control surfaces, standard drop tanks, bombs, landing gear components, wheel well components, propellers (both Hamilton Standard and Aeroproduct), and the two Uncle Dog antennas (parts A4 & A5). Arma Hobby gives you two different horizontal stablizers; one with fabric covered elevators and one with metal covered elevators. A nice feature on Arma Hobby’s part, and each set is molded as one piece which should help with construction and alignment.
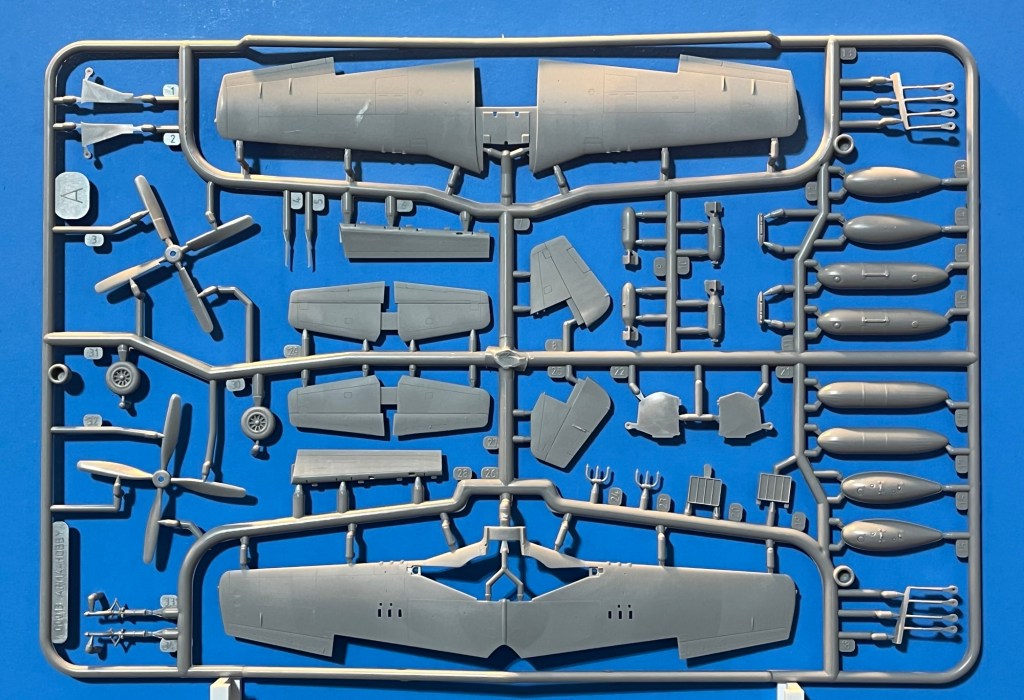
A couple of items worthy of note. First, the panel lines on the wings are very faint except for the parts of the wings which would be accessed be maintenance crews. I am assuming this was done in this manner so if you wanted to represent model as having the puttied wings, it would not take much to fill the panel lines. In addition, the top wing halves have been molded as one piece so as to provide detail for the top of the wheel wells. Again, a nice touch on Arma Hobby’s part as this will allow for ease in masking the top of the wheel wells when painting the support stringers.

The second sprue (B) consists of the fuselage halves, interior and cockpit parts including both the Warren-McArthur and Shick-Johnson seats, separate spinners for the Hamilton Standard cuffed propeller and the Aeroproducts propeller, both types of dorsal fins (swayback for modified D-5s and early D-10s and the regular dorsal fin for later blocks), and both shrouded and unshrouded exhaust stacks.

A couple of items worthy of note. First, unlike the 1/72nd Eduard P-51D Mustang, the rivet detail on the fuselage halves is very restrained. So if rivet detail is important to you in 1/72nd scale, you are going to have to break out your riveter. Second, the structure of the cockpit sides is molded into the fuselage halves as seen below.

I like this approach because the cockpit sides will be easier to paint and detail and it should allow for an easier insertion of the completed cockpit into the fuselage.

The additional sprue contained in this boxing includes both styles of drop tanks carried by Iwo Jima VLR Mustangs, the sway braces for each type of tank, and six HVAR rockets that were carried during strike missions toward the end of conflict in the Pacific Theater. The shapes and contours of the drop tanks look good.

The sprue containing the clear parts (T) contains the windscreen, all three variations of the canopy, and the other clear parts. The windscreen and canopies are crystal clear and the clear sprue is bagged separately to avoid scratches.
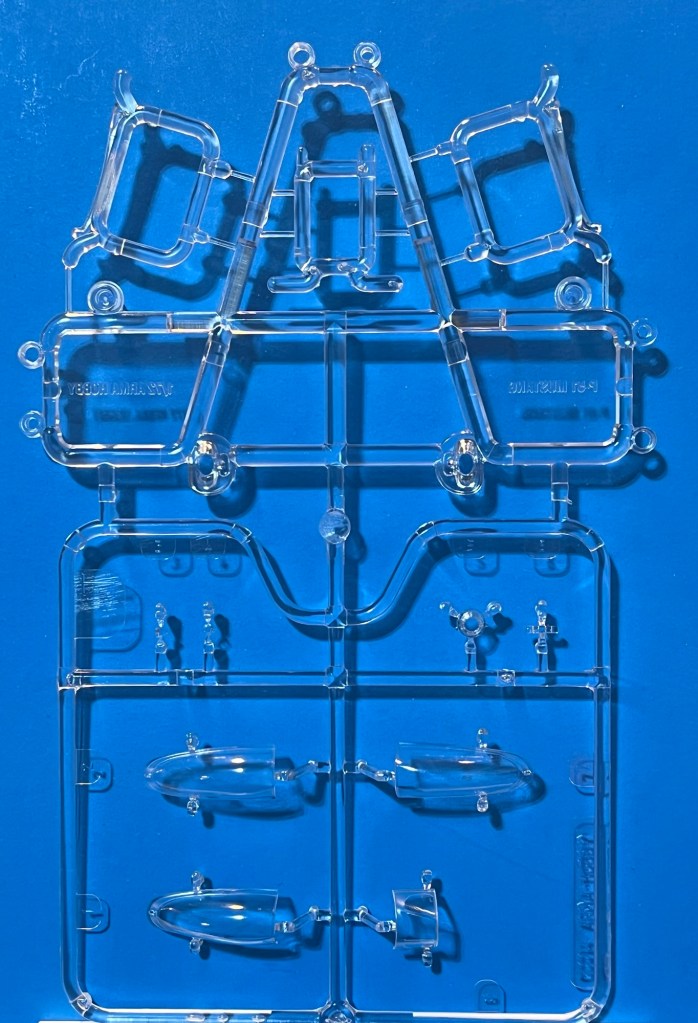
The additional parts at the top of the sprue are parts for a display stand and/or construction jig as shown below. The main landing gear wheels fit in the slots at the front of the stand with wing supports at the sides and fuselage support at the back. Neat idea.

Are there necessary parts missing? Unfortunately, the answer to that question is yes. Arma Hobby failed to include the SCR-695 IFF transmitter that was situated behind the SCR-522 radio transmitter on Iwo Jima VLR Mustangs as shown in the computer generated image below.

John Terrell

This omission is confirmed by their own assembly instructions.

Arma Hobby

How big of an omission is this? Not very. First, in 1/72nd scale, most people viewing a built up model in your display case or even at a model contest would not even recognize this omission. Second, you could easily sand off the detail on the battery and add some plastic pieces to accurately represent the SCR-695 IFF transmitter. Third, you could build an early Iwo Jima VLR Mustang with a single mast antenna before the SCR-695 IFF transmitter/Uncle Dog twin antennae were installed as field modifications. There are a lot of pictures of 15th and 21st FG Mustangs after their arrival on Iwo Jima in early March with the standard single mast antenna.

The decals look really good and are printed by Cartograf so they should work well. Fuselage and tail stripes are provided for the 458th FS Mustang 576 Little One/Jeannie so you will not have to do all of the complex and tedious masking. Nice touch on Arma Hobby’s part. There are also aluminum colored decals for the tops of the wheel wells at the bottom of the decal sheet. The use of the decals will eliminate the need for masking. Just paint the tops of the wheel wells Zinc Chromate Yellow and apply the decals in their appropriate locations. An interesting and novel approach.

Arma Hobby

The aircraft profiles in the instruction booklet are well done. I do not have any photos of 312 Snortin’ Phyllie, so I reached out to Mark Stevens of the 7th Fighter Command Association to see if he could share any photos he has of the plane. Surprisingly, he did not have any photos either, and I could not find any on the internet. Someone obviously has a few photos of this plane.

Arma Hobby
Arma Hobby

The 506th Fighter Group Association has several very nice photos of 576 Little One/Jeannie in its collections.

506th Fighter Group Association
2nd Lt. Francis J. Pilecki (506th Fighter Group Association)
506th Fighter Group Association

506th Fighter Group Association

This looks like an extremely nice 1/72nd North American P-51D Mustang kit. From what I have seen of already built models, they certainly look every bit the part of the real thing. If you are wanting to build a Iwo Jima VLR Mustang in 1/72nd scale, this is an excellent option.

Kudos to Arma Hobby!

Kit Review: Eduard’s 1/72nd P-51D Mustang “Tales of Iwo Jima” Limited Edition Dual Combo Boxing

Eduard recently released its 1/72nd P-51D Mustang “Tales of Iwo Jima” Limited Edition Dual Combo boxing. The box art is very appealing.

Eduard

As can be seen from the kit’s aircraft profiles below, the decal options are similar to the 1/48th scale limited edition boxing in that it provides 12 decal options that cover all nine Iwo Jima VLR Mustang squadrons. They will be the same decal options with one change. The 457th Fighter Squadron decals will be for 539 “Lil Ole Meanie II”, flown by 2nd Lt. William G. Hetland and Lt. Hinkle, instead of 542 “Fighting Lady” flown by 1st Lt. Ralph Gardner and 1st Lt. Chester Jatzcak. The decals for 542 “Fighting Lady” are included in the 1/72 P-51D Mustang Profipack boxing.

Eduard

Below is a large aircraft profile of 539 Li’l Ole Meanie II. I am assuming it was included due to the pin-up art below the canopy of the beautiful woman in state of being partially undressed.

Eduard

I am not going to review the actual plastic parts as I have done that previously. You can find that review here. It is a beautiful and well engineered kit with exquisite rivet detail for a 1/72nd scale kit.

Eduard

No resin parts are included in this limited edition dual combo boxing. Customary of Eduard for limited edition boxings, a color photo etched fret is included for each kit that consists of cockpit components and scribing templates (Parts PE7 and PE19) to create accurate panel lines for the VLR Mustangs. The photo etched frets also contain the scribing and placement template, and parts (PE22-25) for the AN/APS-13 rear warning radar installed on the tail of late model Mustangs. Nice touch on Eduard’s part.

Some of Block 20(NA), and all of Block 25(NA) produced P-51Ds had the AN/APS-13 rear warning radar installed. The AN/APS-13 was a low power UHF tail warning radar transmitter/receiver which was used to detect aircraft approaching from the rear. Below 1500 feet it would have to be turned off, otherwise it would receive false readings from the ground. Its effective range against small fighter sized targets was 280 – 320 meters. When it detected an aircraft, a small red light would come on and a bell would ring. Below is a photo of a 462nd FS Mustang showing the location of the AN/APS-13 radar antennae on the tail.

Loomis Dean/USAAF/National Archives via Fold3

The AN/APS-13 radar was seen as somewhat of a blessing and a curse by pilots. Some 506th FG pilots that I have interviewed indicated it was an annoyance during formation flying because it would keep going off when a threat was not present unless you were the tail end Charlie. 1st Lt. William G. Ebersole of the 462nd FS indicated that it was common practice for pilots on VLR missions to turn the radar off during the long over water approach to Japan, and the long return trip back to Iwo Jima, only switching it on upon reaching the Japanese home islands.

There is a minor error on the assembly instructions that warrants pointing out. The avionics transmitters were different on Iwo Jima VLR Mustangs due to the addition of the SCR-695 IFF transmitter which was located right behind the SCR-522 radio transmitter. This addition necessitated moving the battery to the rear of engine compartment. Below is a nice computer generated image of how this set up looked.

John Terrell

Eduard has accurately produced the SCR-522 radio transmitter and SCR-695 IFF transmitter as one part (E3). Eduard also provides the normal configuration of the SCR-522 radio transmitter and battery as part E2. Below is page 3 of Eduard’s instructions (Step A) showing the assembly of the cockpit parts. Please note that the instructions indicate the correct part (E3), but the assembly drawing is of the SCR-522 radio transmitter/battery part (E2). Do not be confused by the wrong pairing of the part number and drawing. If you are building an Iwo Jima VLR Mustang, use part E3.

Eduard

Kudos to Eduard for putting out a 1/72nd Dual Combo Limited Edition boxing that provides decals for all 9 Iwo Jima VLR Mustang squadron. Nice to not to have to rely on the aftermarket decal industry to supply those options. If you want to build an Iwo Jima VLR Mustang in 1/72nd scale, this is the kit and the boxing to buy.

Kit Review: Eduard’s 1/72nd North American P-51D Mustang Royal Class Dual Combo

I received Eduard’s 1/72nd North American P-51D Mustang Royal Class Dual Combo boxing recently. In scaling down their 1/48th scale P-51D kit to 1/72nd scale, Eduard made it so can you build any variant from a D-5 through a D-25,including the K, without having to buy any extra sprues or after market accessories. For instance, you can build an Iwo Jima VLR Mustang from any boxing they release because all of the necessary parts are present in the kit. Wise decision on Eduard’s part. On to the sprues.

Eduard

The first sprue (A) is the clear parts and they are crystal clear and provide all three of the variations of rear portion of the canopy. The clear parts are bagged separately to protect against scratches.

Eduard

The second sprue (B/C) contains the fuselage halves, wings, and horizontal and vertical stabilizers. All three tails are present, the D-5 without the fillet, the D-5 with the sway-back fillet, and tails with the regular fillet that were on most D-10s and all D-15s, D-20s, D-25s and Ks. Both the flaps and ailerons are molded separately which gives the modeler the ability to position them as he or she desires.

Eduard

The rivet detail is exquisite as shown in the picture below. Yet, Eduard also showed restraint and did not put them on the wings where they would have been puttied over to increase the laminar flow over the wings. Nice touch on Eduard’s part.

Eduard

The third sprue (E) contains a variety of different parts, including the cockpit parts, wheel wells and landing gear parts, spinner and propeller parts, and other external parts. Both types of pilot seats are provided; Warren-McArthur seat ( part E14 ), and Schick- Johnson seat (part E33 ).

The SCR-522 radio set and SCR-695 set which are mounted above the fuselage fuel tank behind the pilot’s seat are molded as one piece along with the mounting framework ( part E3)

Included also are the twin Uncle Dog antennae (parts E56 & E57).

Because Eduard designed the kit so you can build any variant of the D model from Block 5 through Block 25, Eduard has included three different versions of the right side cockpit panel. Nice touch on Eduard’s part.

The fourth sprue (F) contains all of the underwing ordinance and drop tanks carried by Mustangs, the Hamilton uncuffed propeller blades, the Aero Products propeller blades, and some minor cockpit parts. Included are the 110 and 165 gallon drop tanks (with sway braces), and HVAR rockets carried by Iwo Jima VLR Mustangs.

As we come to expect from Eduard, this Royal Class Dual Combo boxing comes with a lot extra goodies. In addition to two pre-painted photo etch cockpit frets and canopy masks, there are two 3D printed Warren-McArthur seats, two 3D printed sets of exhaust stacks (one shrouded and one unshrouded), two sets of cast resin main tires, and two cast resin tail wheels.

Eduard

In addition, Eduard has included a set of OMask foam wheel well plugs that make it incredibly easy to paint the wing area around wheel wells without any tape. They also included OMask foam wheel well plugs in their 1/48 North American P-51B Mustang Royal Class Dual Combo boxing and their 1/48 Curtiss P-40E Warhawk Royal Class Dual Combo boxing. Really nice touch on Eduard’s part! Let’s hope this trend continues.

There decals for 14 different planes in this boxing. Included are decals for two Iwo Jima VLR Mustangs.

Iwo Jima VLR Mustang Decals: The first set of markings is for 528 “The Enchantress” (P-51D-25-NA, 44-72671), a 457th FS Mustang flown by 2nd Lt. William E. Saks. 2nd Lt. Saks was one of the pilots lost on the June 1, 1945 “Black Friday” mission, but he was not flying 528 on that day. “The Enchantress” is popular amongst modelers because the nose art and pin-up girl that adorns the fuselage.

Eduard

The second set of VLR markings is for 555 “The Ole Lady/Little Anne/My Darlin Betty Ann” (P-51D-25-NA, 44-72628), a 458th FS Mustang flown by 2nd Lts. James E. Coleman and Ralph R. Coltman, Jr. I like the markings that appear on the right side of the fuselage, and decals are provided for the blue diagonal stripes on the tail.

Eduard

The main decals come in one really large decal sheet along with two smaller decal sheets that contain complete sets of stencils.

Eduard
Eduard
Eduard

This looks like an extremely nice 1/72nd North American P-51D Mustang kit. From what I have seen of already built models, they certainly look every bit the part of the real thing. If you are wanting to build a Iwo Jima VLR Mustang in 1/72nd scale, this is your kit.

Eduard also announced that they will do a limited edition Iwo Jima VLR Mustang boxing in the 2nd quarter of this year. If you want additional decal options, the limited edition boxing will be worth waiting for.

Kudos to Eduard!

Kit Review: Arma Hobby 1/72 Nakajima Ki-84 Ko/Otsu Hayate Expert Set (70051) and Basic Model Kit (70052)

In keeping with their initial business model of releasing 1/72 single engine fighters, the good folks at Arma Hobby have recently released a Nakajima Ki-84 Hayate (Frank).

Tamiya, Revell and Hasegawa have all released 1/72nd Ki-84s, but these kits are decades old. The Hasegawa kit is still being produced, and while it is a nice kit, it has raised panel lines, a very basic cockpit without a lot of detail, and a one piece canopy. Sword released a Ki-84 in 2008, and a pre-production version in 2010, but these are limited run kits that are no longer being produced. So it is nice to see a new tool Ki-84 in 1/72nd scale.

As of the date of this post, Arma Hobby has released two boxings of this kit; an Expert Set (with photo-etch parts and masks), and a basic model kit. It is customary for Arma Hobby to release at least two boxings of each kit, so it will be interesting to see if they release another boxing.

Arma Hobby

There are three sprues included in the basic model kit; one with the fuselage, wing, engine, cockpit, and undercarriage parts; one with the horizontal surfaces, drop tanks and bomb parts; and one with the clear parts.

The level of detail in the cockpit is exceptional, and the designers have done a great job keeping the cockpit components to scale. This makes for very delicate parts in which great care is needed when removing them from the sprues and cleaning the parts up. All of the great detail can be showcased since the canopy can be posed open.

The surface detail on the kit is also very nice.

The canopy parts are thin and crystal clear.

As indicated above, the Expert Set comes with a photo etched fret that includes the engine wiring harness, seat belts, and cockpit parts. The masks for the canopy and wheels are made of kabuki tape instead of vinyl.

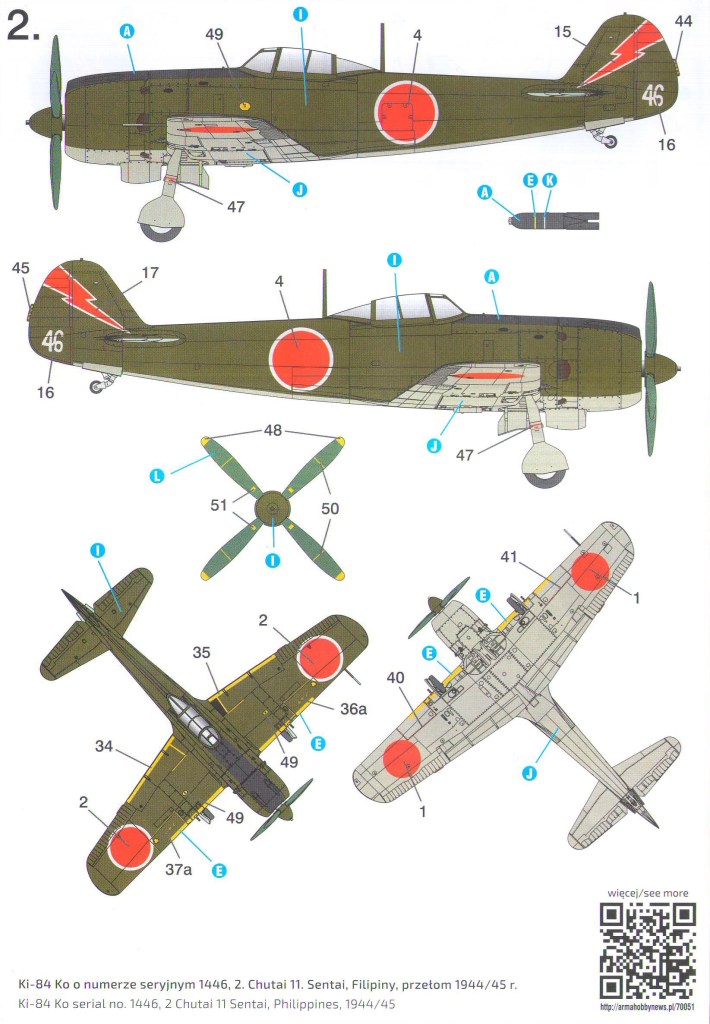
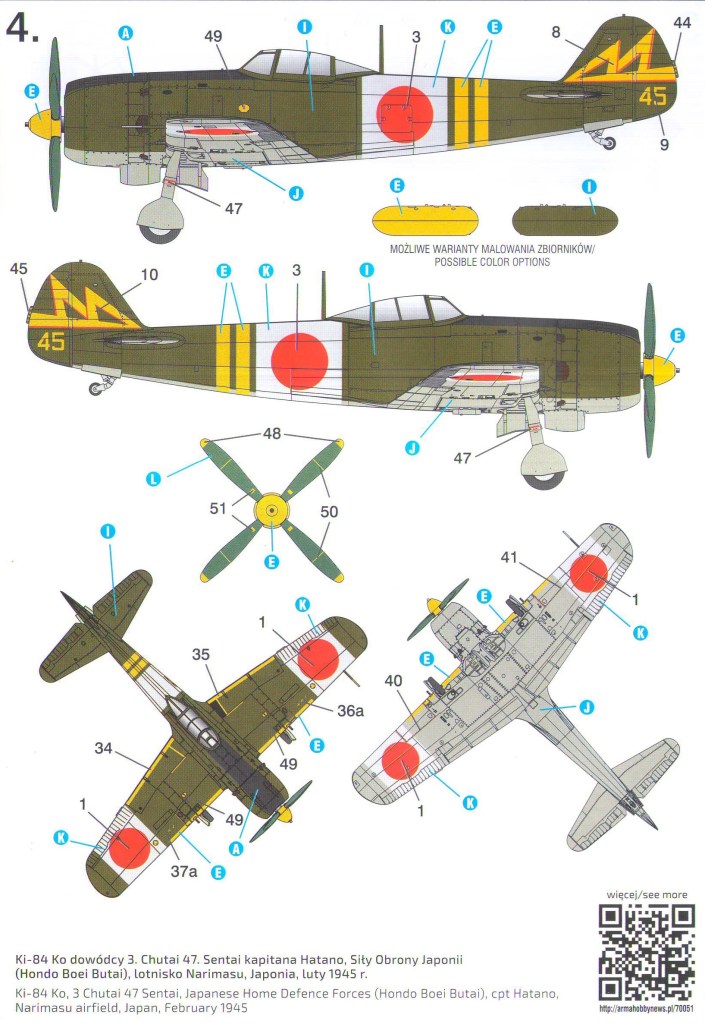
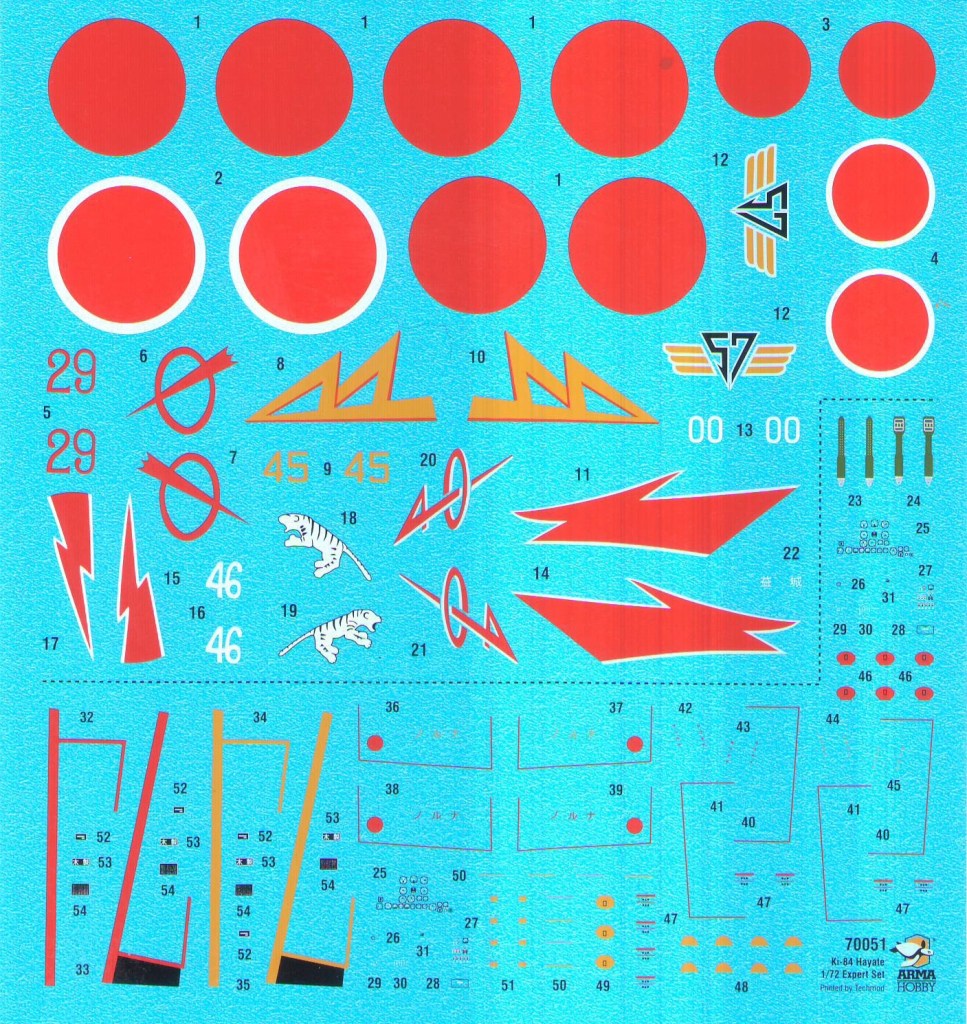
Six decal options are included in the Expert Set, which allows the modeler to choose between Home Defense Hayates, a Philippine based Hayate, and CBI based Hayate, and a kamikaze (57th Shimbu-tai). The decals are printed by Techmod.

Arma Hobby
Arma Hobby
Arma Hobby
Arma Hobby
Arma Hobby
Arma Hobby
Decals in Expert Set (Arma Hobby)
Arma Hobby

The basic model kit provides two decal options; one Home Defense Hayate and a Philippine based Hayate

Arma Hobby
Arma Hobby
Decals in the basic Model Kit (Arma Hobby)

This looks to be another great kit from Arma Hobby. If you would like to see some built up models, please visit Arma Hobby’s website https://www.armahobby.com/. They have an excellent blog that not only shows built models, but also features articles focusing on the history of the planes included in their kits. Very cool.

If you would like to follow a build in progress, Jeff Groves over on Inch High Guy is doing a batch build of six kits. The first two installments of his batch build are here https://inchhighguy.wordpress.com/2022/07/15/arma-hobby-nakajima-ki-84-hayate-frank-batch-build-in-1-72-scale-part-i/ and here https://inchhighguy.wordpress.com/2022/07/22/arma-hobby-nakajima-ki-84-hayate-frank-batch-build-in-1-72-scale-part-ii/.

Nostalgic Kit Review: Koster Aero Enterprises 1/48 PB4Y-2 Privateer Vacu-formed Conversion Kit

For a long time, if you wanted to build a 1/48 Consolidated PB4Y-2 Privateer, Bill Koster’s vacu-formed conversion kit for the Monogram B-24 kit was the only game in town.

Bill passed away on September 13, 2020, after a battle with cancer at the age of 91. Bill worked for several decades as a kit designer for Revell-Monogram. After his retirement, he founded Koster Aero Enterprises through which he produced and sold vacu-formed kits and conversion sets for aircraft that the mainline model manufacturers ignored. Bill was a great ambassador for our hobby and was liked by all who met him.

I have purchased a couple of Bill’s B-24 turret sets over the years, and I was fortunate to purchase the PB4Y-2 Privateer conversion kit at an estate sale recently.

Koster Aero Enterprise

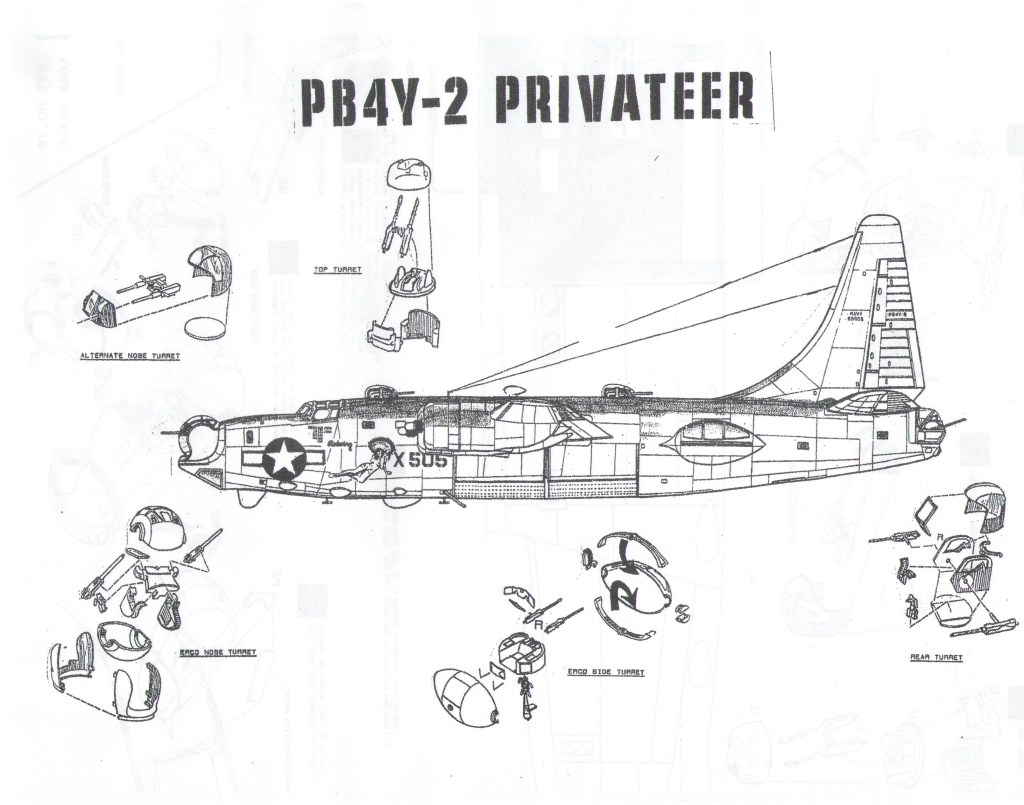
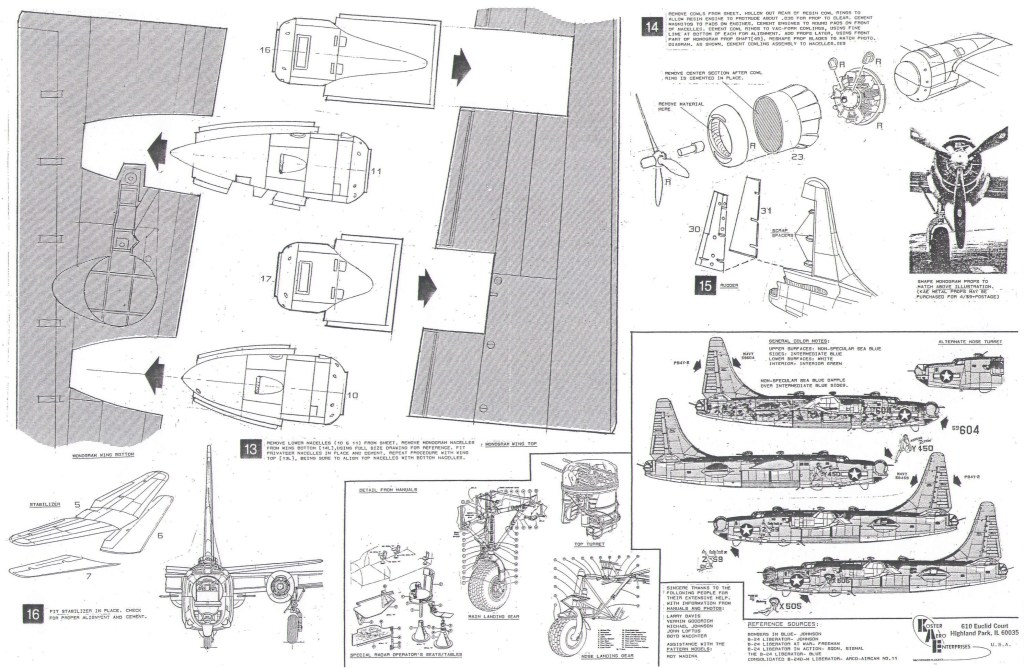
As you can see from the instructions below, the conversion kit uses the fuselage center section (bomb bay area), wings, landing gear, propellers, and cockpit pieces from the Revell-Monogram kit. Either the B-24D or the B-24J version of the Revell-Monogram kit will work for this conversion.

Koster Aero Enterprises

It appears that the main conversion pieces were formed using .050 to .060 mm thick plastic sheets. An inspection of these parts reveals a very good uniform thickness was maintained during the vacu-forming process.

Koster Aero Enterprises

These parts will be fairly sturdy during the process of removing them from their respective sheets, and during the construction process.

Koster Aero Enterprises

While you cannot see them from the photos, Bill also incorporated some very nice recessed panel lines on the fuselage pieces.

Koster Aero Enterprises

While the photo below does not do the vacu-formed clear parts justice, the parts are without distortion; pretty much crystal clear. For the most part, they are thick enough, and therefore sturdy, to withstand the process of removing them from the sheet. The exception is the two main parts for the A-6 gun turrets. Because of their height, the plastic on top gets fairly thin and are prone to being damaged easily. Care is needed when removing them.

Koster Aero Enterprises

The front of the cowls, engines, and gun turret parts are cast in resin. They are beautifully cast with a minimal amount of clean-up. Because the interiors of the gun turrets will visible due to the quality of the vacu-formed clear parts, the resin parts provide a base for super detailed turrets.

Koster Aero Enterprises

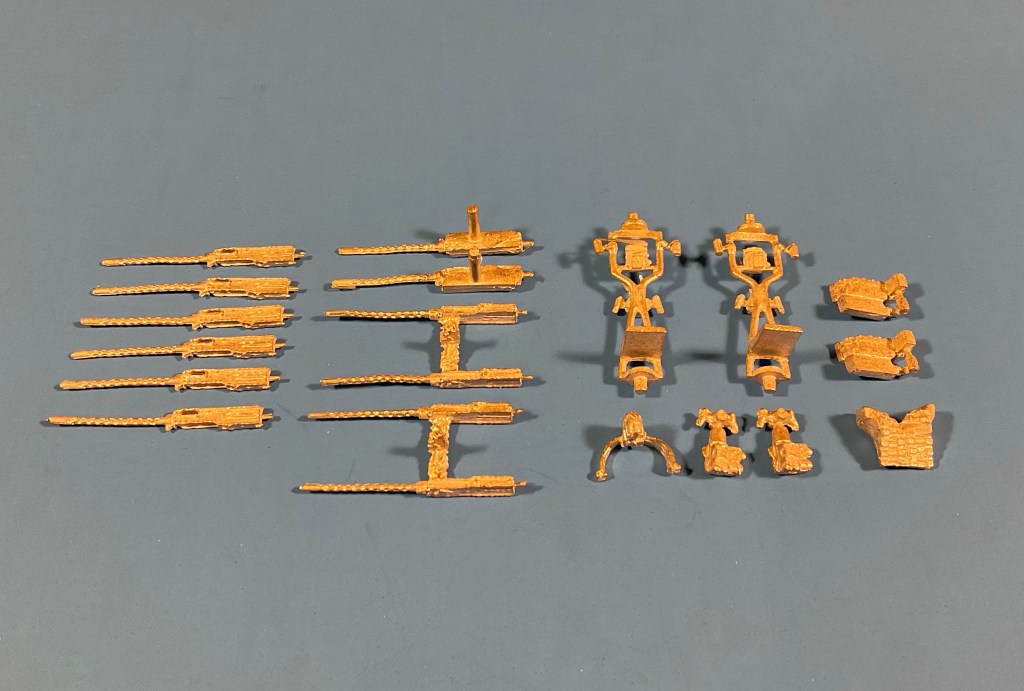
The conversion kit also comes with white metal parts as shown below. As you can tell, the 50 caliber machine gun barrels are very malleable and hard to get perfectly straight. The solution to this problem is to replace the barrels with the really nice brass barrels from Master Models, or to replace the entire machine guns with Eduard’s resin Browning M-2 machine guns.

Koster Aero Enterprises

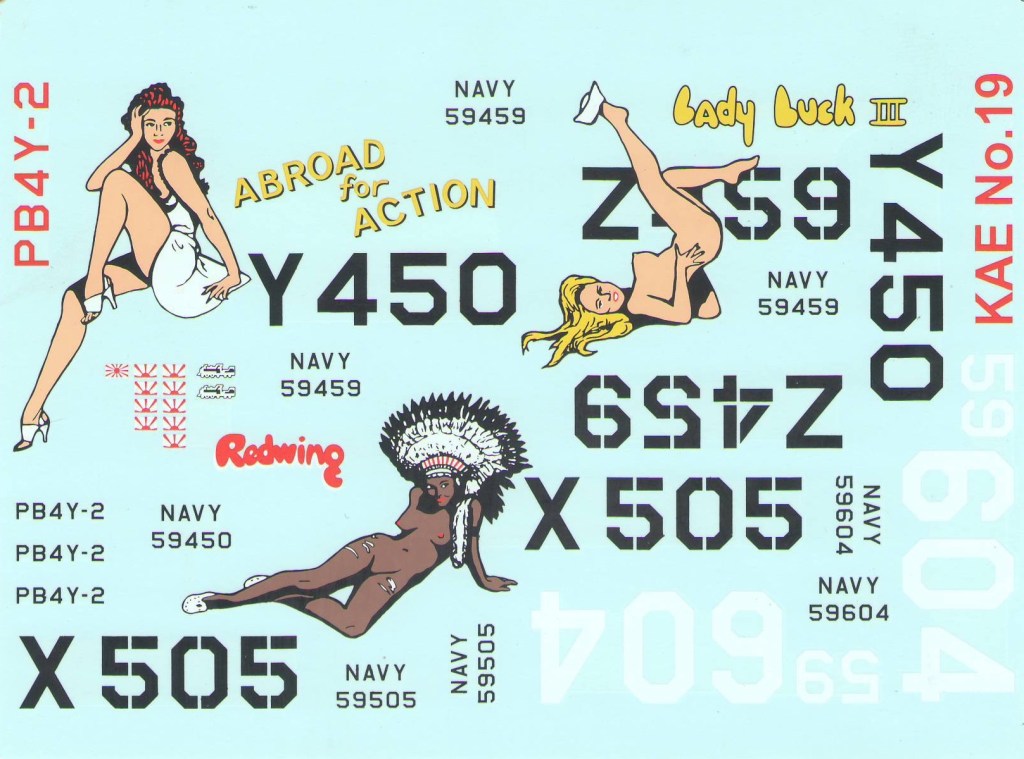
Last, but not least, Bill included decals for four aircraft. They are very nice, in register, and provide three nose art options. The PB4Y-2 provided a large canvas for great nose art. National insignia are not included, so you will have to get them from other sheets or use masks.

Koster Aero Enterprises

Since this conversion kit is no longer in production, they are hard to come by. They do show up on eBay periodically, but not very often. I was fortunate to pick this one up at an estate sale. I have never attempted a vacu-formed conversion kit, so this should be an interesting project.

Stayed tuned as I will be reviewing a full resin 1/48 PB4Y-2 kit from Wilde Sau Resin, and 1/48 PB4Y-2 decal sheets from Cutting Edge/Pyn-Up Decals (now the Fine Art of Decals).