Eduard recently released its 1/72nd P-51D Mustang “Tales of Iwo Jima” Limited Edition Dual Combo boxing. The box art is very appealing.
Eduard
As can be seen from the kit’s aircraft profiles below, the decal options are similar to the 1/48th scale limited edition boxing in that it provides 12 decal options that cover all nine Iwo Jima VLR Mustang squadrons. They will be the same decal options with one change. The 457th Fighter Squadron decals will be for 539 “Lil Ole Meanie II”, flown by 2nd Lt. William G. Hetland and Lt. Hinkle, instead of 542 “Fighting Lady” flown by 1st Lt. Ralph Gardner and 1st Lt. Chester Jatzcak. The decals for 542 “Fighting Lady” are included in the 1/72 P-51D Mustang Profipack boxing.
Eduard
Below is a large aircraft profile of 539 Li’l Ole Meanie II. I am assuming it was included due to the pin-up art below the canopy of the beautiful woman in state of being partially undressed.
Eduard
I am not going to review the actual plastic parts as I have done that previously. You can find that review here. It is a beautiful and well engineered kit with exquisite rivet detail for a 1/72nd scale kit.
Eduard
No resin parts are included in this limited edition dual combo boxing. Customary of Eduard for limited edition boxings, a color photo etched fret is included for each kit that consists of cockpit components and scribing templates (Parts PE7 and PE19) to create accurate panel lines for the VLR Mustangs. The photo etched frets also contain the scribing and placement template, and parts (PE22-25) for the AN/APS-13 rear warning radar installed on the tail of late model Mustangs. Nice touch on Eduard’s part.
Some of Block 20(NA), and all of Block 25(NA) produced P-51Ds had the AN/APS-13 rear warning radar installed. The AN/APS-13 was a low power UHF tail warning radar transmitter/receiver which was used to detect aircraft approaching from the rear. Below 1500 feet it would have to be turned off, otherwise it would receive false readings from the ground. Its effective range against small fighter sized targets was 280 – 320 meters. When it detected an aircraft, a small red light would come on and a bell would ring. Below is a photo of a 462nd FS Mustang showing the location of the AN/APS-13 radar antennae on the tail.
Loomis Dean/USAAF/National Archives via Fold3
The AN/APS-13 radar was seen as somewhat of a blessing and a curse by pilots. Some 506th FG pilots that I have interviewed indicated it was an annoyance during formation flying because it would keep going off when a threat was not present unless you were the tail end Charlie. 1st Lt. William G. Ebersole of the 462nd FS indicated that it was common practice for pilots on VLR missions to turn the radar off during the long over water approach to Japan, and the long return trip back to Iwo Jima, only switching it on upon reaching the Japanese home islands.
There is a minor error on the assembly instructions that warrants pointing out. The avionics transmitters were different on Iwo Jima VLR Mustangs due to the addition of the SCR-695 IFF transmitter which was located right behind the SCR-522 radio transmitter. This addition necessitated moving the battery to the rear of engine compartment. Below is a nice computer generated image of how this set up looked.
John Terrell
Eduard has accurately produced the SCR-522 radio transmitter and SCR-695 IFF transmitter as one part (E3). Eduard also provides the normal configuration of the SCR-522 radio transmitter and battery as part E2. Below is page 3 of Eduard’s instructions (Step A) showing the assembly of the cockpit parts. Please note that the instructions indicate the correct part (E3), but the assembly drawing is of the SCR-522 radio transmitter/battery part (E2). Do not be confused by the wrong pairing of the part number and drawing. If you are building an Iwo Jima VLR Mustang, use part E3.
Eduard
Kudos to Eduard for putting out a 1/72nd Dual Combo Limited Edition boxing that provides decals for all 9 Iwo Jima VLR Mustang squadron. Nice to not to have to rely on the aftermarket decal industry to supply those options. If you want to build an Iwo Jima VLR Mustang in 1/72nd scale, this is the kit and the boxing to buy.
I received Eduard’s 1/72nd North American P-51D Mustang Royal Class Dual Combo boxing recently. In scaling down their 1/48th scale P-51D kit to 1/72nd scale, Eduard made it so can you build any variant from a D-5 through a D-25,including the K, without having to buy any extra sprues or after market accessories. For instance, you can build an Iwo Jima VLR Mustang from any boxing they release because all of the necessary parts are present in the kit. Wise decision on Eduard’s part. On to the sprues.
Eduard
The first sprue (A) is the clear parts and they are crystal clear and provide all three of the variations of rear portion of the canopy. The clear parts are bagged separately to protect against scratches.
Eduard
The second sprue (B/C) contains the fuselage halves, wings, and horizontal and vertical stabilizers. All three tails are present, the D-5 without the fillet, the D-5 with the sway-back fillet, and tails with the regular fillet that were on most D-10s and all D-15s, D-20s, D-25s and Ks. Both the flaps and ailerons are molded separately which gives the modeler the ability to position them as he or she desires.
Eduard
The rivet detail is exquisite as shown in the picture below. Yet, Eduard also showed restraint and did not put them on the wings where they would have been puttied over to increase the laminar flow over the wings. Nice touch on Eduard’s part.
Eduard
The third sprue (E) contains a variety of different parts, including the cockpit parts, wheel wells and landing gear parts, spinner and propeller parts, and other external parts. Both types of pilot seats are provided; Warren-McArthur seat ( part E14 ), and Schick- Johnson seat (part E33 ).
The SCR-522 radio set and SCR-695 set which are mounted above the fuselage fuel tank behind the pilot’s seat are molded as one piece along with the mounting framework ( part E3)
Included also are the twin Uncle Dog antennae (parts E56 & E57).
Because Eduard designed the kit so you can build any variant of the D model from Block 5 through Block 25, Eduard has included three different versions of the right side cockpit panel. Nice touch on Eduard’s part.
The fourth sprue (F) contains all of the underwing ordinance and drop tanks carried by Mustangs, the Hamilton uncuffed propeller blades, the Aero Products propeller blades, and some minor cockpit parts. Included are the 110 and 165 gallon drop tanks (with sway braces), and HVAR rockets carried by Iwo Jima VLR Mustangs.
As we come to expect from Eduard, this Royal Class Dual Combo boxing comes with a lot extra goodies. In addition to two pre-painted photo etch cockpit frets and canopy masks, there are two 3D printed Warren-McArthur seats, two 3D printed sets of exhaust stacks (one shrouded and one unshrouded), two sets of cast resin main tires, and two cast resin tail wheels.
Eduard
In addition, Eduard has included a set of OMask foam wheel well plugs that make it incredibly easy to paint the wing area around wheel wells without any tape. They also included OMask foam wheel well plugs in their 1/48 North American P-51B Mustang Royal Class Dual Combo boxing and their 1/48 Curtiss P-40E Warhawk Royal Class Dual Combo boxing. Really nice touch on Eduard’s part! Let’s hope this trend continues.
There decals for 14 different planes in this boxing. Included are decals for two Iwo Jima VLR Mustangs.
Iwo Jima VLR Mustang Decals: The first set of markings is for 528 “The Enchantress” (P-51D-25-NA, 44-72671), a 457th FS Mustang flown by 2nd Lt. William E. Saks. 2nd Lt. Saks was one of the pilots lost on the June 1, 1945 “Black Friday” mission, but he was not flying 528 on that day. “The Enchantress” is popular amongst modelers because the nose art and pin-up girl that adorns the fuselage.
Eduard
The second set of VLR markings is for 555 “The Ole Lady/Little Anne/My Darlin Betty Ann” (P-51D-25-NA, 44-72628), a 458th FS Mustang flown by 2nd Lts. James E. Coleman and Ralph R. Coltman, Jr. I like the markings that appear on the right side of the fuselage, and decals are provided for the blue diagonal stripes on the tail.
Eduard
The main decals come in one really large decal sheet along with two smaller decal sheets that contain complete sets of stencils.
EduardEduardEduard
This looks like an extremely nice 1/72nd North American P-51D Mustang kit. From what I have seen of already built models, they certainly look every bit the part of the real thing. If you are wanting to build a Iwo Jima VLR Mustang in 1/72nd scale, this is your kit.
Eduard also announced that they will do a limited edition Iwo Jima VLR Mustang boxing in the 2nd quarter of this year. If you want additional decal options, the limited edition boxing will be worth waiting for.
Kits-World makes a number of very nice decal sheets in both 1/72nd and 1/48th scale for modelers who are building either the 1/72nd Academy or the 1/48th Monogram Boeing B-29A Superfortress.
Decals for one of those B-29s, Thumper (Serial Number 42-24623), are provided in both 1/72nd scale (KW172133) for the Academy kit and in 1/48th scale (KW148142) for the Monogram kit.
Kits-World Decals
The other set of decals on these sheets are for Sic ‘Em!, a 343rdBS/598th BG B-29 while stationed at Yokota, Japan during the Korean Conflict.
Kits-World Decals
As can be seen from the photos below, Thumper’s mission symbols were a smaller version of the cartoon character nose art with the name of the target location printed on the bomb. Aerial victories were noted by a Japanese flag on a flag pole carried by cartoon character.
Thumper on Mariana Islands (via World War Photos)
Missions with multiple aerial victories were noted by the same number of flags on one or two flag poles. By the end of its tour, the crew of Thumper would claim 26 aerial victories. I could not find a photo of the right side of the nose during Thumper’s time in the Marianas to determine if the nose art was on both sides of the nose. Kit-World provides two decals of the nose art so if you are so inclined to put it on both sides of the nose, you can. Nice touch on Kit-World’s part.
Thumper and crew on the Mariana Islands (via Wings Over New Zealand Aviation Forum)
As you can see, the art work for both sets of markings looks really good. In addition, the printing of the decal sheet is very well done and in register. A complete set of national insignia are provided for both planes.
Kits-World Decals
Thumper was also significant in that it was the first Marianas based B-29 to complete 40 bombing missions. In late July of 1945, Thumper and its crew were sent home for a short-lived war bond tour. The two photos below are of Thumper while on the war bond tour. Please note a few changes. First, the mission and aerial victory symbols have changed to the traditional mission and aerial victory symbols. Gone are the mini-Thumpers riding a bomb and holding flag poles with flags to denote the missions and aerial victories.
Thumper and crew on War Bond Tour (via World War Photos)
Second, the plane number “21” has been painted on the nose. I could not find any Marianas based pictures that showed the plane number painted on the nose, so it is difficult to determine when that change was made. Third, in the picture below, it shows that both the nose art and the mission and aerial victories symbols are on the right side of the nose, as well as the left side of the nose. The Kits-World decal sheet only provides the mission and aerial victory for one side of the nose of the war bond tour Thumper.
Thumper on War Bond Tour (via National Museum of the United States Air Force)
This is a very nice decal sheet with only one short coming as noted above. Highly recommended if you intend to build the Marianas based Thumper.
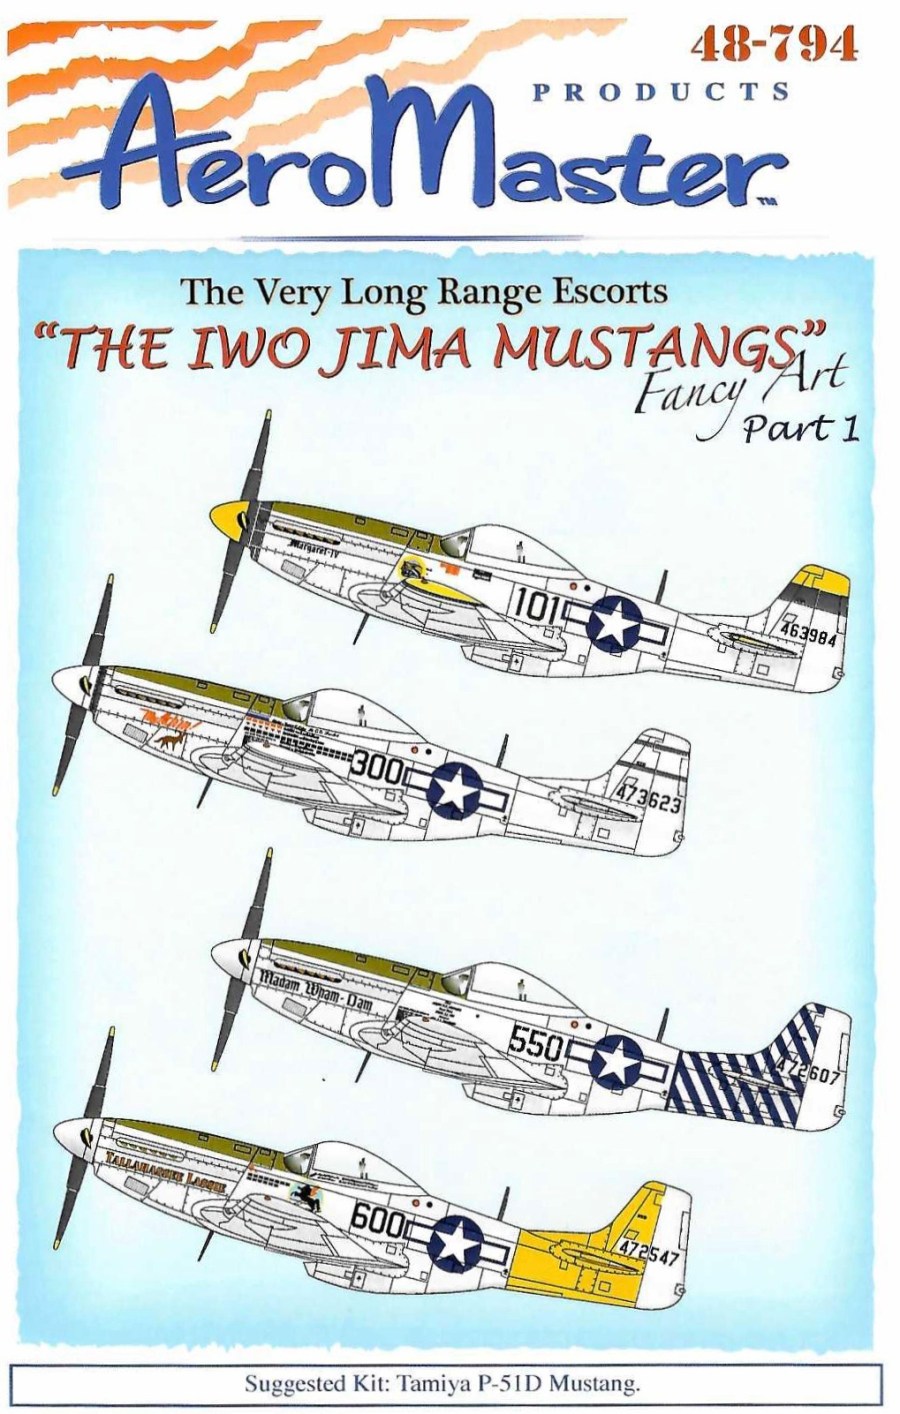
This is AeroMaster’s second decal sheet dedicated solely to Iwo Jima VLR Mustangs. Three additional sheets on Iwo Jima VLR Mustangs would be subsequently issued by AeroMaster under the series “The Very Long Range Escorts ‘The Iwo Jima Mustangs’ Fancy Art.”
AeroMaster Decals
This sheet provides markings for the planes of two VLR aces: Major James B. Tapp’s 101 “Margaret – IV” (8 aerial victories), and Major Harry C. Crim, Jr.’s 300 “My Achin! [Ass]” (6 aerial victories).
AeroMaster Decals
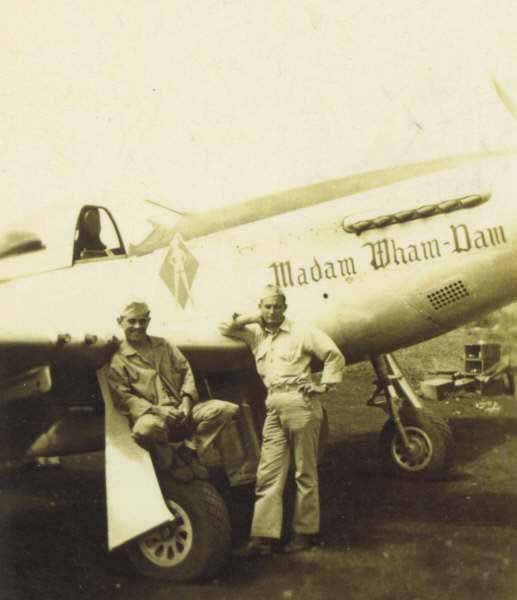
The sheet also provides markings for the planes of two 506th FG squadron commanders: Major Harrison E. Shipman’s 550 “Madam Wham-Dam” (458th FS), and Major Thomas D. DeJarnette’s 600 “Tallahassee Lassie” (462nd FG).
AeroMaster Decals
Originally issued in 2005, the decals look good, are in register and are for the most part accurate. Photo documentation that has recently emerged shows there are a few omissions and errors on this sheet, but this is still a very nice decal sheet.
AeroMaster Decals
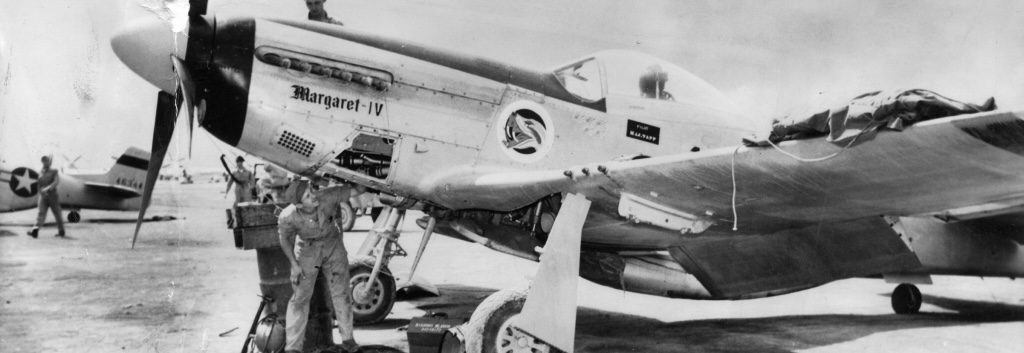
Major James B. Tapp (78thFS/15th FG) – Major Tapp was the second highest scoring VLR Mustang ace with 8 aerial victories. All eight victories were scored in 101 “Margaret – IV” (44-63984), a P-51D-20NA. Major Tapp scored 4 aerial victories on the first VLR mission on April 7, 1945. He scored another victory on April 12, 1945, which represents the 5 victories on the decal sheet.
Major James B. Tapp’s 101 Margaret-IV (7th Fighter Command Association/Mark W. Stevens)
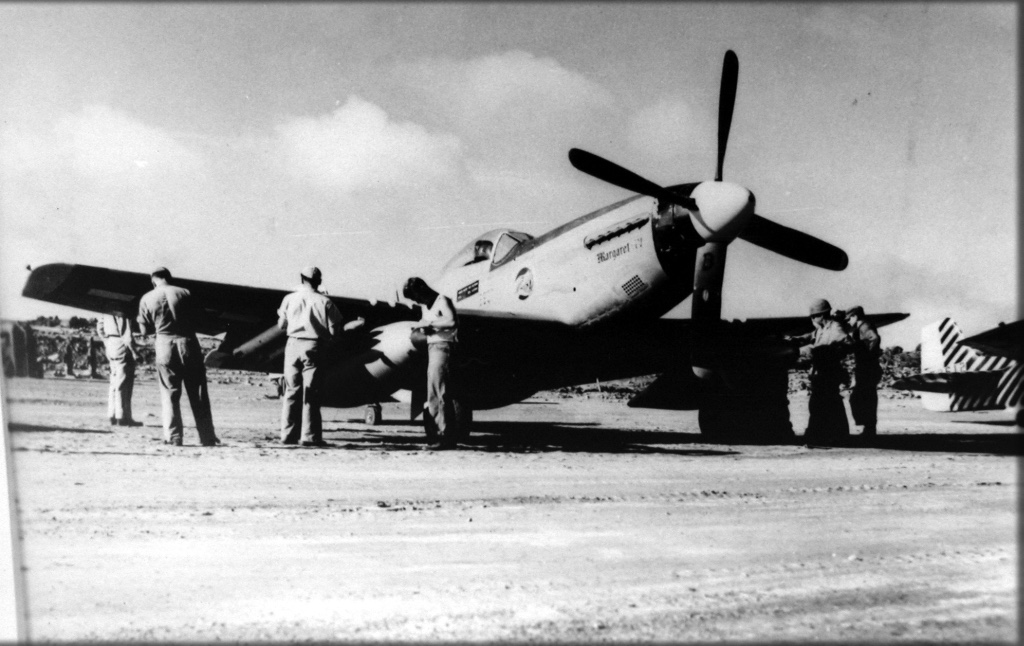
As can be seen from the photo above and the photo below, the name “Margaret – IV” and the Bushmaster squadron emblem are on both sides of the nose. The photo below shows that there are additional markings on the right side of the fuselage below the canopy.
Major James B. Tapp’s 101 Margaret-IV (7th Fighter Command Association/Mark W. Stevens)
This last photo shows the markings on the right side of the fuselage which includes kill and mission markings. In addition to the name of the Crew Chief Sergeant Blanco, there is the name of another ground crew member which is undiscernable from the photo. This photo also shows that the 0 in the fuselage number is broken rather than solid.
Crew Chief Sgt. Blanco on the wing of Major James B. Tapp’s 101 “Margaret-IV” with unknown crew member in cockpit (Brian Walter)
Unfortunately, the kill and mission markings on the right side of Major Tapp’s Mustang are not contained on this decal sheet. The most accurate and complete decals for 101 “Margaret – IV” are found in the Eduard kits.
Major Harry C. Crim, Jr. (531st FS/21st FG) – Major Crim was the 3rd highest scoring VLR ace with six confirmed victories, and the only fighter ace of the 21st FG. He joined the 21st FG in August, 1944, after serving with the 14th Fighter Group in Tunisia flying the Lockheed P-38 Lightning. Unable to score any aerials victories with 14th FG, he scored his first two victories, a Kawasaki Ki-61 “Tony” and a Kawasaki Ki-45 “Nick” on April 7, 1945, the first VLR mission flown by the 7th Fighter Command Mustangs. His last victory, a Mitsubishi A6M Zero, came on July 6, 1945 during a strike mission against Atsugi airfield. Major Crim was also credited with six ground victories.
Assistant Crew Chief Sergeant Stanley McCarro in the cockpit of Major Crim’s 300 “My Achin! [Ass]” (Harry Crim via Tom Ivie/Carl Molesworth)
44-73623 was a P-51D-25NA, and Major Crim’s second VLR Mustang. The kill markings, mission markings, and ground crews’ names appear to be very good on the decal sheet except for Asst. Crew Chief Stanley McCarro’s name being misspelled. The only other deficiency in these decals is the artwork for the donkey/ass.
Major Harry C. Crim Jr.’s 300 “My Achin! [Ass]”
The photo above shows a portion of the canvas wheel well covers which were a standard production feature that were discarded by European Theater Mustang groups, but were maintained in place by the Iwo Jima Mustang groups as a means of keeping sand and volcanic grit out of the wheel wells.
After Major Crim rotated home, “My Achin! [Ass]” was assigned to Flight Officer Theo Gruici, who had Major Crim’s kill and mission markings and the names of the ground crew removed, and had a reclining nude painted on the fuselage. Most decal manufacturers have a nude on the left landing gear cover for Major Crim’s markings, but I have yet to see a photo confirming this. The nude on the left landing gear cover is mostly obscured by the 110 gallon drop tank in the photo below, and it raises the question whether there was a nude also on the right landing gear cover. After inquiring of others who have more extensive photo collections than I do, there does not appear to be any photos of the right side of the plane. Some questions will never be answered.
Flight Officer Theo Gruici’s 300 “My Achin! [Ass]” (7th Fighter Command Association/Mark W. Stevens)
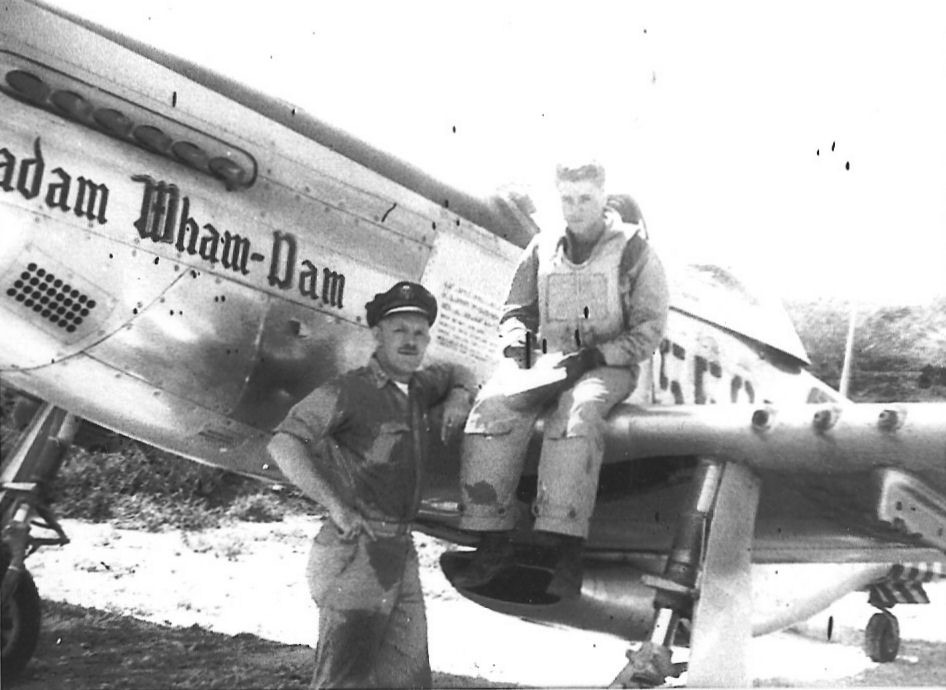
Major Harrison E. Shipman (458th FS/506th FG) – 550 “Madam Wham-Dam”, a P-51D-25NA, 44-72607, was assigned to Major Harrison E. Shipman, commander of the 458th FS. Major Shipman served as the 458th’s commander during the squadron’s time on Iwo Jima, and was not credited with any aerial victories.
Major Harrison E. Shipman in 550 “Madam Wham-Dam” (Harrison E. Shipman via 506th Fighter Group Association)
The actual color of the background for the nude nose art on the right side of the fuselage in front of the cockpit is unknown. AeroMaster provides you with three options; red, blue and yellow. My preference would be blue, but it could be red as well. It appears to be a little too dark for yellow.
Major Harrison E. Shipman sitting on the wing of 550 “Madam Wham-Dam” with Captain Pete Nowick(Harrison E. Shipman via 506th Fighter Group Association)
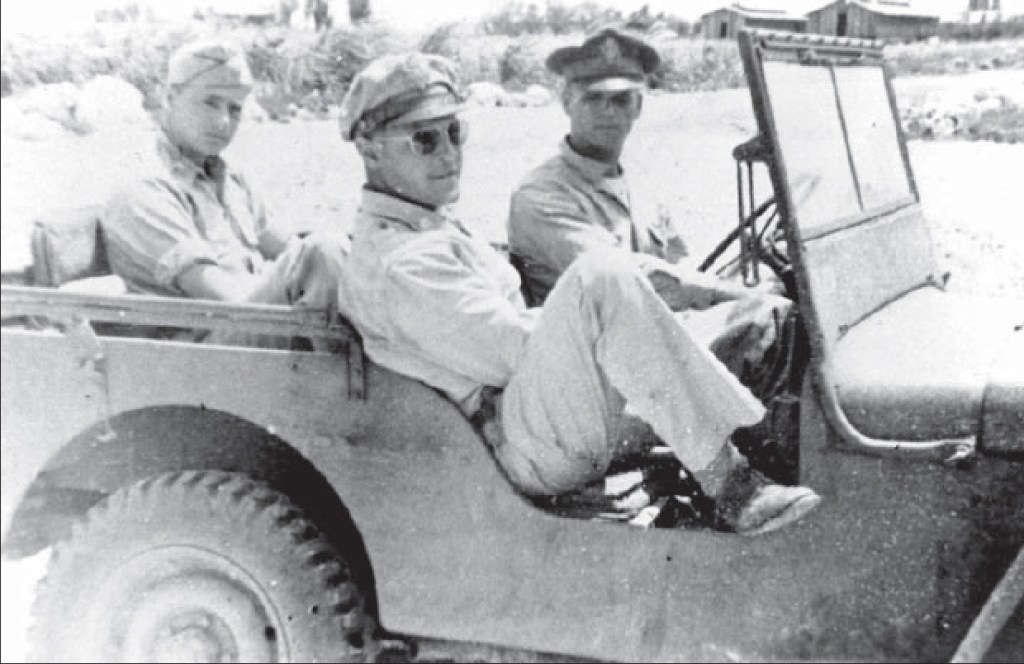
“Madam Wham-Dam’s” time on Iwo Jima was short lived. She arrived on either May 11th or the 13th and was lost on the disastrous June 1, 1945, Black Friday mission with 506th FG Deputy Commander Lt. Col. Harvey J. Scandrett at the controls.
Major Harrison E. Shipman and Lt. Col. Harvey J. Scandrett with “Madam Wham-Dam” (Harrison E. Shipman via 506th Fighter Group Association)
Please note the last two photos of “Madam Wham-Dam” and the color of the main landing gear legs. They are considerably darker than the main landing gear legs on either Major Tapp’s “Margaret – IV” or Major Crim’s “My Achin! [Ass]” which suggests that they have been painted. I have also seen what appears to painted landing gear legs in pictures of 21st Fighter Group Mustangs.
506th Fighter Group Squadron Commanders from left to right: Major Harrison E. Shipman (458th), Major Thomas D. DeJarnette (462nd), and Major Malcolm C. “Muddy” Waters (457th) (Harrison E. Shipman via James Shipman)600 “Tallahassee Lassie” (Curt Gwaltney via Carl Molesworth)
Major Thomas D. DeJarnette (462nd FS/506th FG) – 600 “Tallahassee Lassie”, a P-51D-20NA, 44-72547, was also flown by Lt. Col. Harley Brown, Deputy Commander of the 506th Fighter Group. DeJarnette and Brown were well acquainted with each other having flown Bell P-39 Airacobras in combat with in 80th Fighter Squadron, 8th Fighter Group in New Guinea earlier in the war. Major DeJarnette is in the back row of the photo above, second from the left. Lt. Col. Brown is to Major DeJarnette’s left.
Major DeJarnette was credited with shooting down a Kawasaki Ki-61 ‘Tony’ on the June 10, 1945 escort mission to the Tokyo area. Lt. Col. Brown was credited with damaging a Nakajima Ki-84 ‘Frank’ on the July 19, 1945 fighter strike mission against targets in the Nagoya and Osaka areas. Both men survived the war.
This decal sheet has been long out of production but you can still find it on eBay with the other sheets in the series. Although there are a few inaccuracies and omissions, it is still a quality decal sheet.
If you are wanting to purchase a more recently produced decal sheet for some of these planes, DK Decals has produced a 1/72 scale sheet containing markings for “My Achin! [Ass] and “Madam Wham-Dam”. My review of this sheet is found here:
Very Long Range P-51 Mustang Units of the Pacific War; Carl Molesworth; Osprey Publishing Limited (2006).
As a condition of the use of materials from the 7th Fighter Command Association website, the following disclaimer is included: Permission to use, copy and distribute documents delivered from this Worldwide Web server and related graphics is hereby granted, provided 1) That the use of the data will not be used for obtaining a profit of any kind, and 2) That the above disclaimer notice appear in all copies and that both that disclaimer notice and this permission notice appear. All other rights reserved. The name of “7th Fighter Command Association” may not be used in advertising or publicity pertaining to distribution of this information without specific, written prior permission. Mark Stevens and the 7th Fighter Command Association makes no representations about the suitability of this information for any purpose. It is provided “as is” without express or implied warranty. Mark Stevens and the 7th Fighter Command Association disclaim all warranties with regard to this information, including all implied warranties of merchantability and fitness. In no event shall Mark Stevens or the 7th Fighter Command Association be liable for any special, indirect or consequential damages or any damages whatsoever resulting from loss of use, data or profits, whether in an action of contract, negligence or other action, arising out of or in connection with the use or performance of this information.
AeroMaster produced several decals sheets featuring markings for Northrop’s P-61 Black Widow night fighter. One sheet, Black Widows Best Sellers Pt. 1 (48-628), provides markings for three 548th NFS Black Widows that were stationed on Iwo Jima.
AeroMaster Decals
As can be seen from the aircraft profiles, 548th NFS Black Widows are identified by their distinctive red spinners and cowl flaps. On this sheet, decals are provided for Midnite Madness, Cooper’s Snoopers, and The Spook/Anonymous III.
AeroMaster Decals
This decal sheet was released in 2003 and was printed by Cartograf. The artwork is really nice, and the sheet includes national insignias, squadron badges, uniform markings and stencils in addition to the plane specific nose art. The decals are in register which is what you would expect from Cartograf.
AeroMaster Decals
Midnite Madness was a P-61A-11 Black Widow (Serial No. 42-5610) flown by Captain James W. Bradford. The Radar Observer (R/O) was Lt. Lawrence K. Lunt and the Gunner-Observer was MSgt. Reno H. Sukow. Because it is difficult to determine the color of the lettering of the name from black and white photos, AeroMaster has given you three options: light blue, yellow and red. Midnite Madness was written off and salvaged after a landing accident with The Spook/Anonymous III on April 20, 1945.
Captain James W. Bradford in Midnite Madness on Iwo Jima (Jeff Kolln via Eric Shulenberger, PhD, JD)
Cooper’s Snooper was a P-61B-2 Black Widow (Serial No. 42-39454) flown by Captain George C. Cooper. The Radar Observer was 2nd Lt. Stanley S. Babst and the Gunner-Observer was SSgt. James O. Miller. Cooper’s Snooper would survive the war and end up in a boneyard at Clark Air Force Base in the Philippines.
Cooper’s Snooper on Iwo Jima (Dave Weisman via Eric Shulenberger, PhD, JD)
The Spook/Anonymous III was P-61B-1 Black Widow (Serial No. 42-39405) flown by Lt. Melvin W. Bode. His Radar Observer was Lt. Avery J. Miller and the Gunner-Observer was Lt. John C. Hope. The Spook/Anonymous III was lost of April 20, 1945, when it landed in dense fog and collided with Midnite Madness. Both Black Widows were written off.
The Spook/Anonymous III on Iwo Jima (Melvin Bode/Mickey Russell via Eric Shulenberger, PhD, JD)
This decal sheet is no longer in production and is hard to find. Every once in a while it shows up on eBay. These three aircraft are also on the following AeroMaster decal sheets:
Midnite Madness – Midnight Widows Part II (48-474)
AeroMaster Decals
The Spook/Anonymous III – Midnight Widows Part III (48-475)
AeroMaster Decals
Cooper’s Snooper – Midnight Widows Part IV (48-489)
AeroMaster Decals
Again, all of these decal sheets are no longer in production and are hard to find. In subsequent posts, I will review decal sheets that contain markings for 548th NFS Black Widows from other decal manufacturers (Kits World and Print Scale) that are in production and readily available to modelers in 1/72nd, 1/48th and 1/32nd scales.