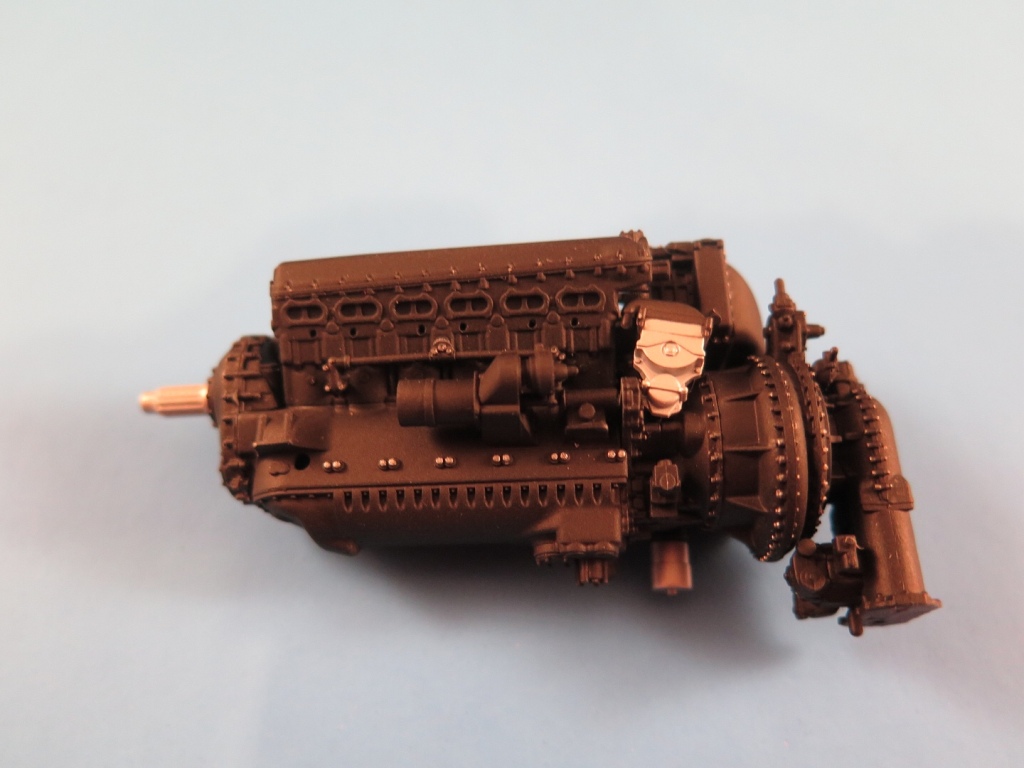
Here is the assembled and painted Packard built Rolls Royce Merlin engine. I painted the engine with Mr. Color Flat Black (33) because I wanted the durable finish that only a lacquer based paint can provide. It will be handled some while adding detail (ignition harnesses, spark plug wires, plumbing, etc . . .), and water based acrylics are just not that durable. I used a flat paint because I colored the numerous bolt heads and nuts with a Sanford Prismacolor Metallic Silver pencil, and these pencils just do not work well on gloss paints.
I purchased some round lead wires ranging from .2 mm to .6 mm for some of the additional detail to be added to the engine from UMM-USA. The lead wires should make it easier as far as forming the ignition harnesses and spark plug wires.
Owned by master modeler, John Vojtech, UMM-USA is an on-line store specializing in tools and supplies for adding fine detail to models. Worth a look if you are getting into adding fine detail to your models. http://www.umm-usa.com/
Happy New Year to all those who are following this blog! I greatly appreciate your interest not only in the models, but also in the pilots and the history. Best wishes for a productive year with lots of bench time and many completed builds.
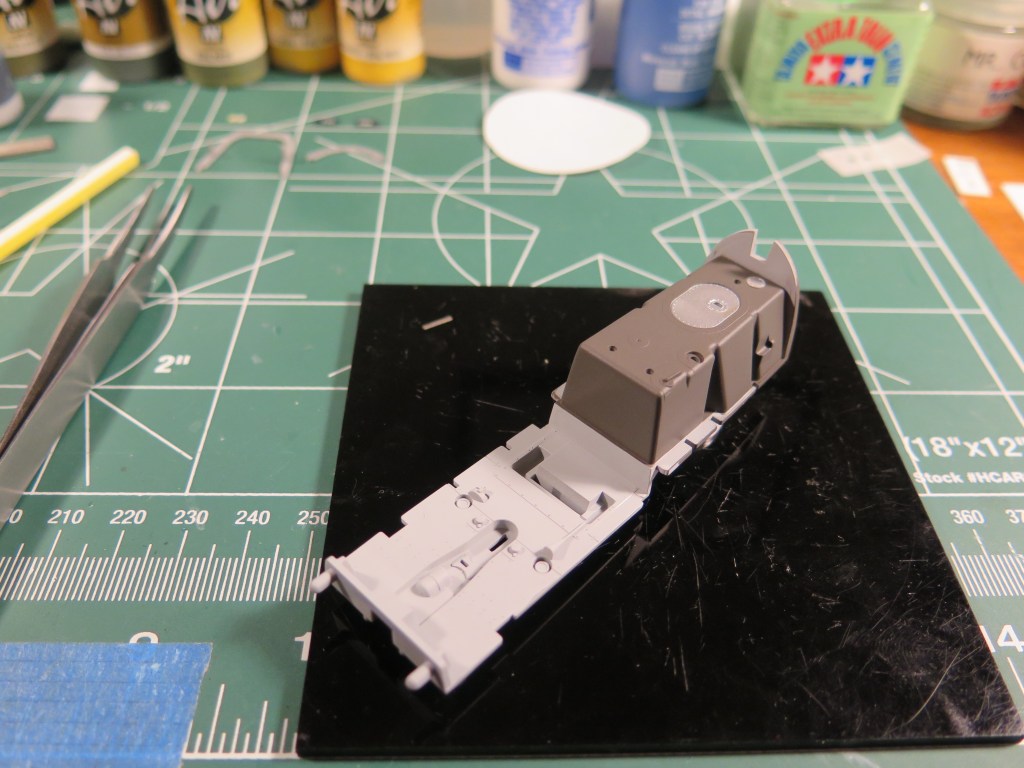
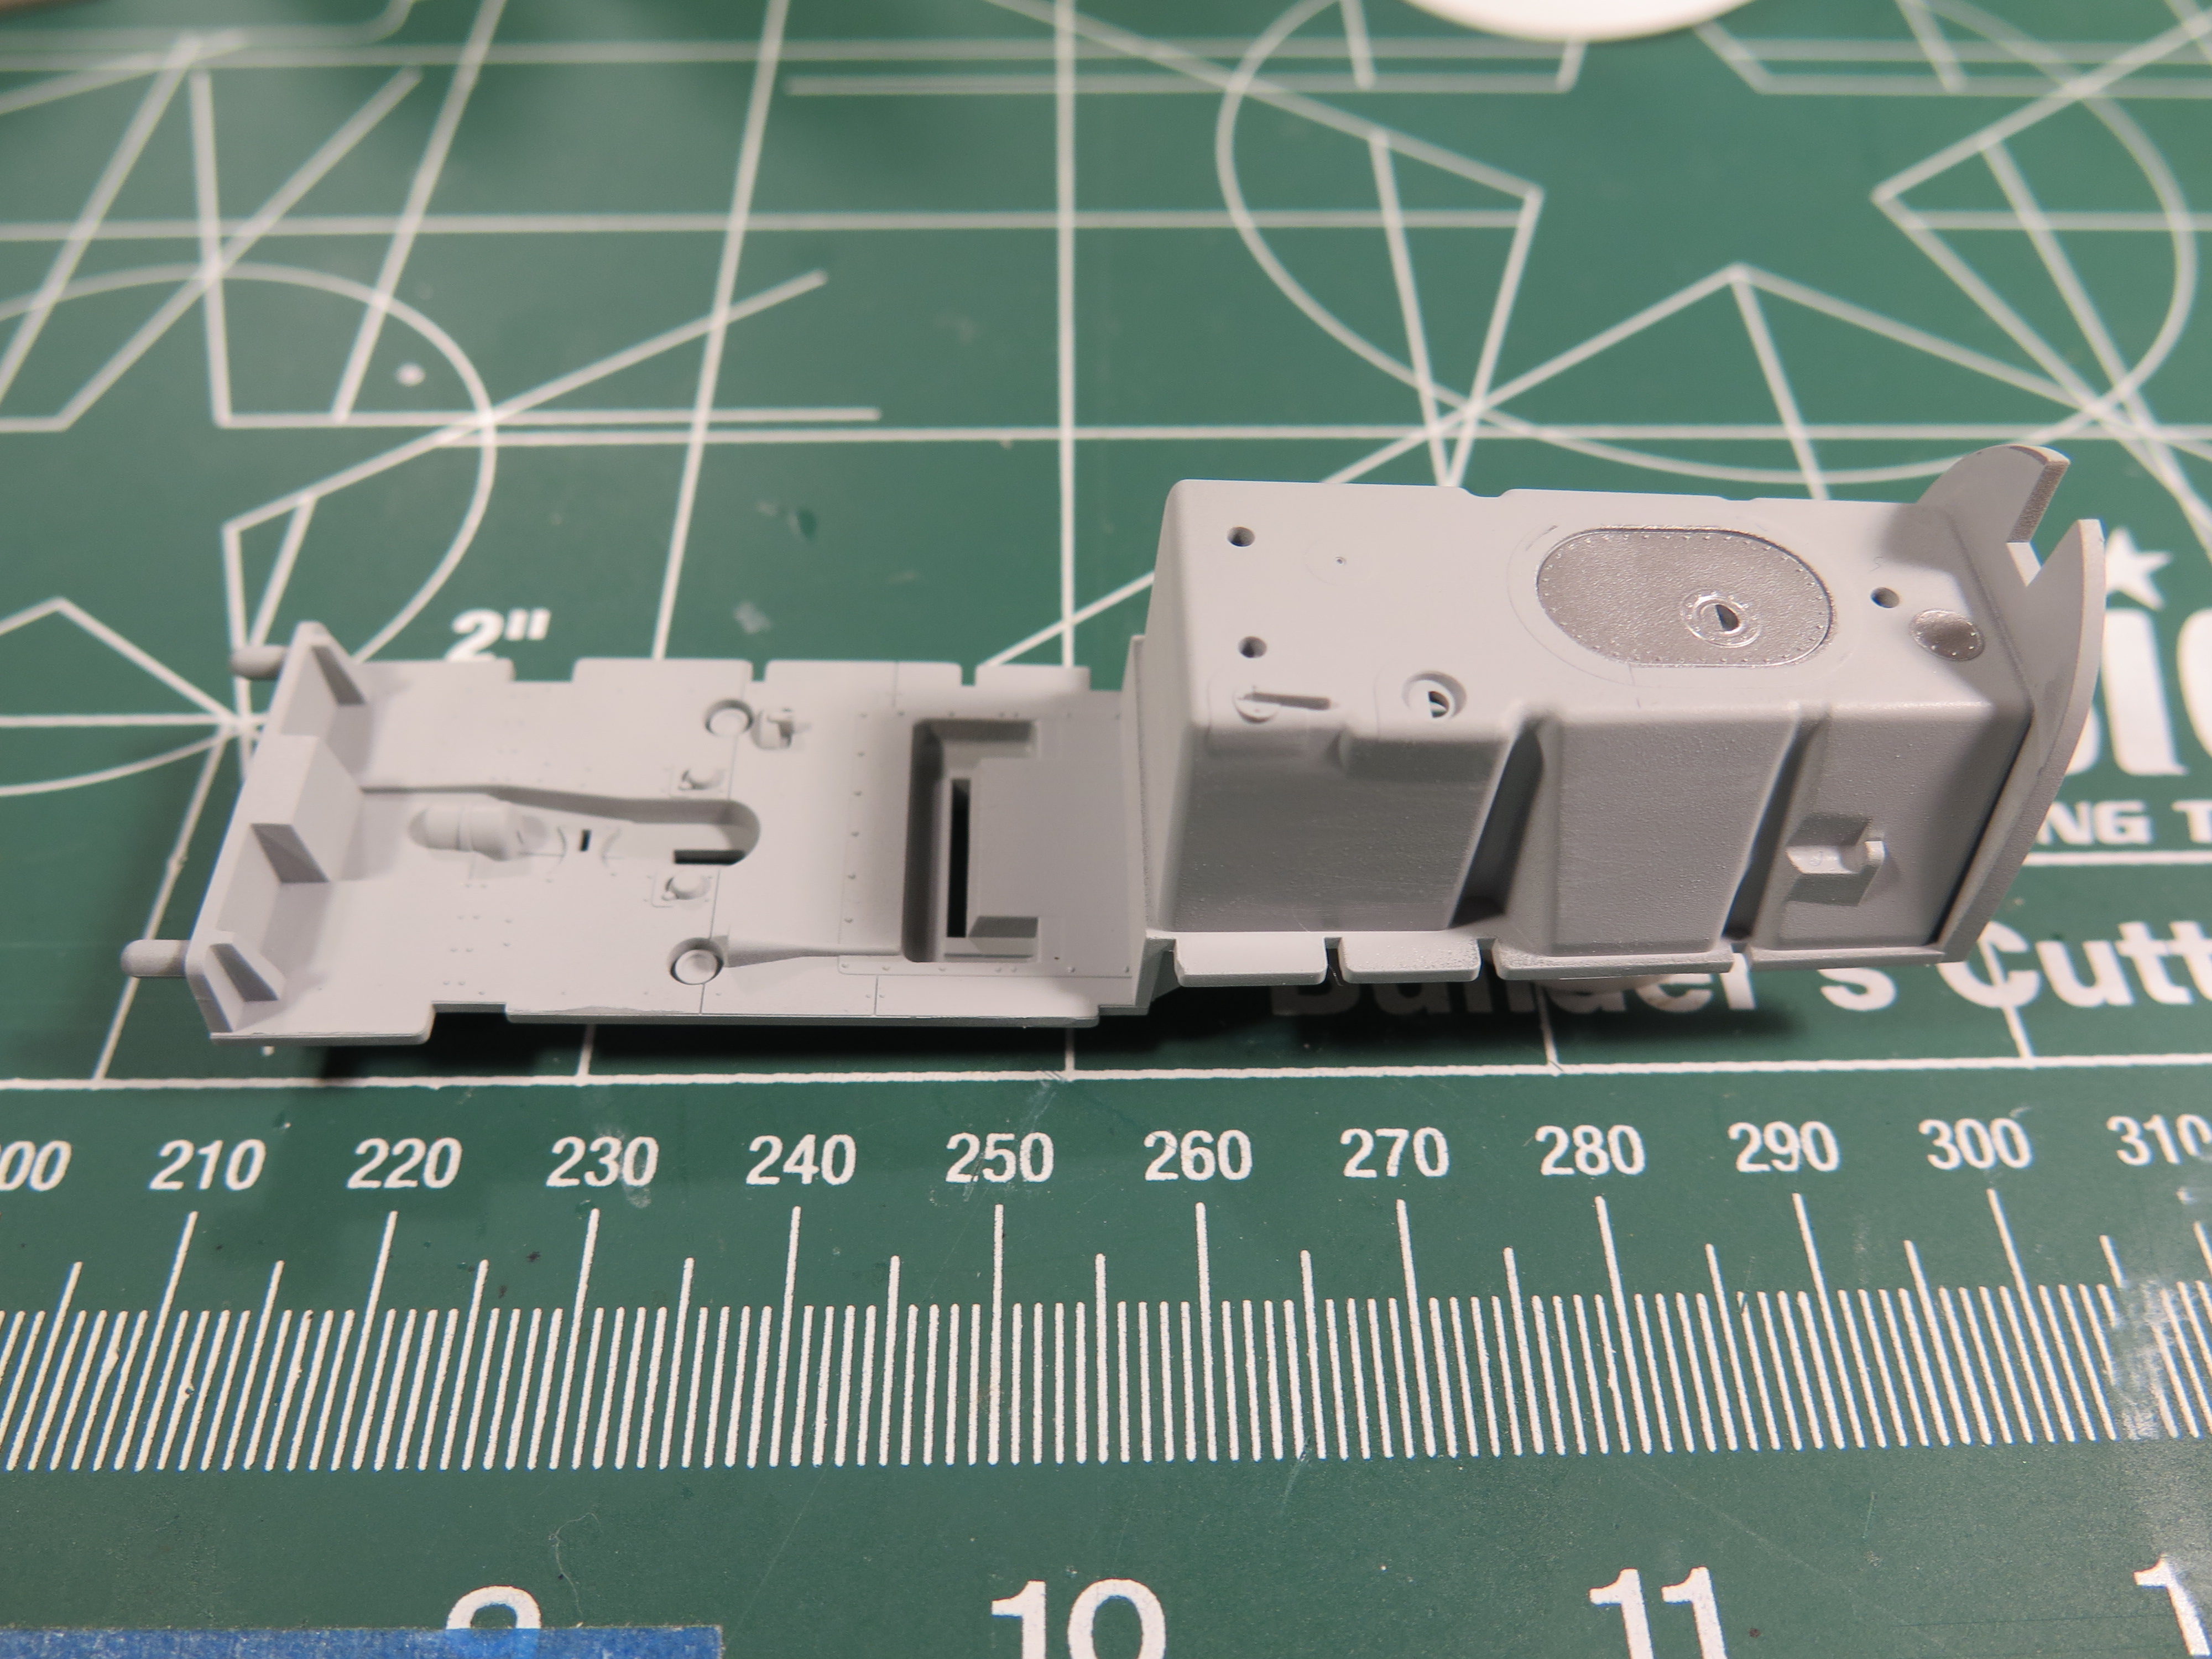
Fuselage Fuel Tank – After spraying the cockpit floor and fuselage fuel tank with Alclad II Grey Primer & Microfiller (ALC 302), I masked off the areas on the top of the tank that were metal and sprayed them Alclad II Aluminum (ALC 101).
The fuselage fuel tank in a Mustang was made of a self-sealing rubber material. Because the actual color of the tank does not look like stark black, I painted it with Vallejo Model Air Tyre Black (71.315). Below is a picture of a P-51D Mustang fuselage tank. I know the tendency is to just paint it black, but several model paint manufacturers make a black rubber color that is very realistic. In addition to Vallejo, the following are some paint manufacturers that make a black rubber color: AK Interactive Acrylic Rubber/Tires (AK720), AK Interactive Real Colors Rubber Black (RC022), Ammo of Mig Jimenez Rubber & Tires (A.MIG-033), Mr. Color Tire Black (C137), and MRP/Mr. Paint Tyre – Rubber (MRP173). So whether you use acrylics, enamels, or lacquers, there is a black rubber tire color out there for you.
P-51 Special Interest Group Forum
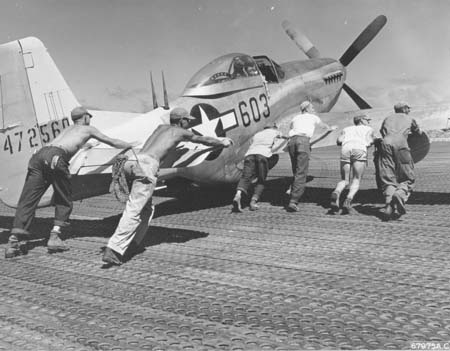
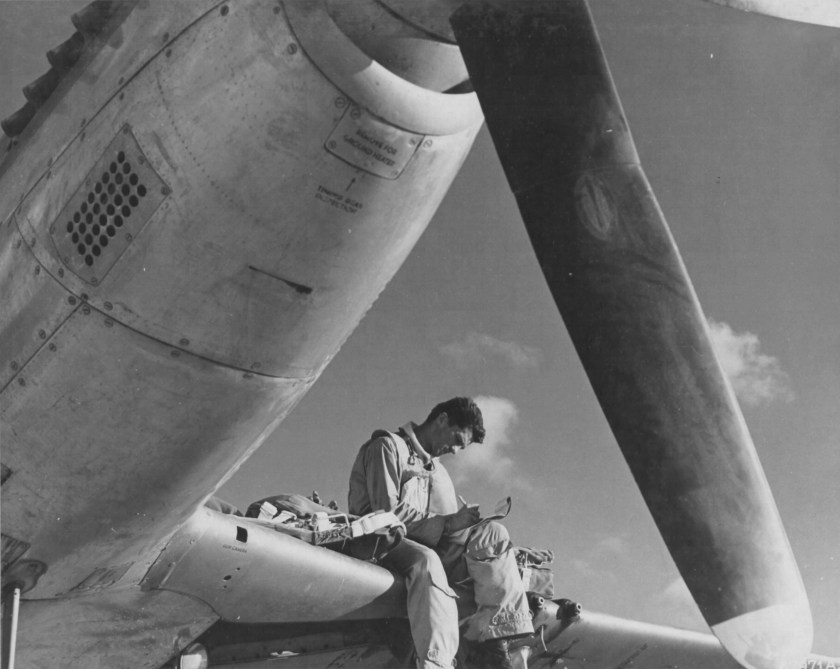
I like the look of the black rubber color, and after the cockpit floor is completed, the fuselage fuel tank will be clear coated and weathered for a more realistic look. It was incredibly difficult to keep combat aircraft clean and in a pristine condition, and therefore, building a realistic model of the actual plane requires some weathering. Considering the conditions on Iwo Jima, keeping the sand and grit out of places where it should not be was a constant battle for maintenance crews. As you can see from the two photos below, a tremendous amount of sand/dust/grit was kicked up on takeoffs, let alone when the wind just blew on Iwo Jima. While you cannot see a lot of the fuselage fuel tank when the SCR 522 Radio Transmitter and SCR 695 IFF Transmitter sets are installed and the fuselage halves joined, I still like to be as accurate as possible in capturing a realistic look in the model.
Loomis Dean/USAAF/National Archives via Fold3Loomis Dean/USAAF/National Archives via Fold3
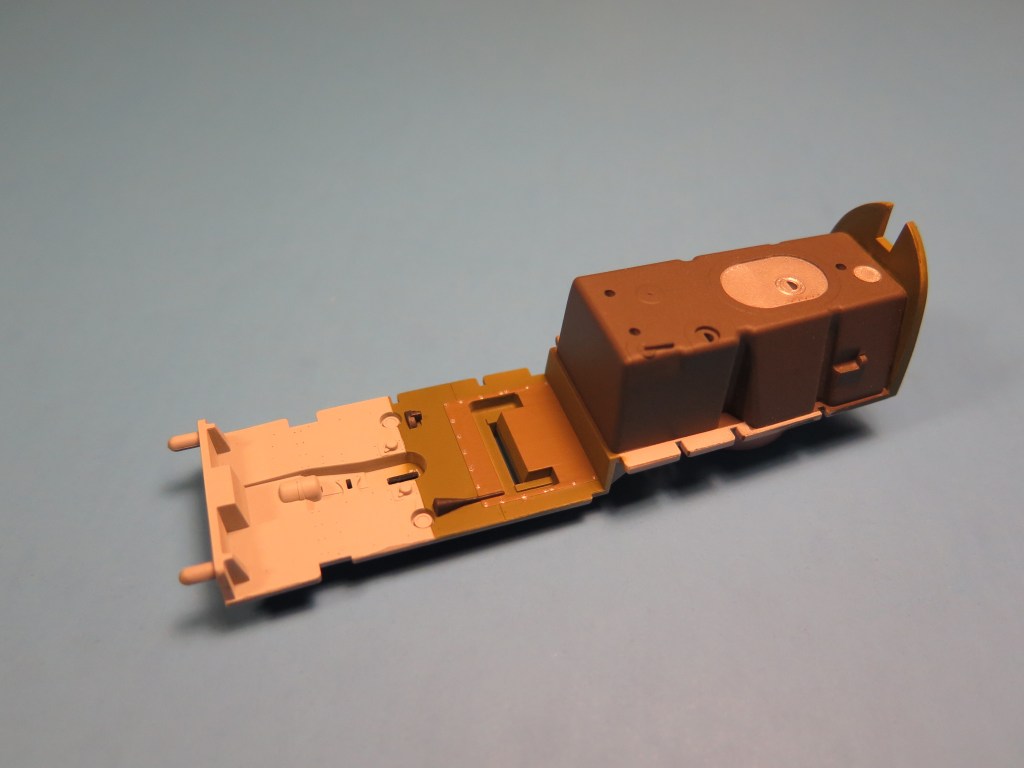
Cockpit Floor – The cockpit floor in the P-51D was plywood for the most part. The front portion was painted with a black anti-skid material, and the back portion (under the seat) was painted Interior Green (ANA 611). In addition, there was a canvas cover underneath the seat that allowed maintenance crews to access control cables after removing the seat. Below is a picture taken from the book North American P-51D Mustang by Robert Peczkowski (Mushroom Model Publications, Yellow Series No. 6126) which shows the colors of the cockpit floor and the canvas cover. Tamiya did a really nice job of adding the canvas cover as detail in their 1/32nd scale kit.
Robert Peczkowski
I used Vallejo Model Air Interior Green (71.010) for the back portion of the cockpit floor, and then brushed Vallejo Panzer Aces Canvas (314) for the canvas cover under the seat. The snaps on the canvas cover were colored using a Prismacolor Metallic Silver pencil.
I want to show wear and tear on the front portion of the cockpit floor that would have occurred on the black anti-skid coating from the pilot’s boots working the rudder pedals. I have seen wartime photos in which the anti-skid coating was worn off down the to plywood in front of, under and behind the rudder pedals. To achieve this, the plan is to paint the front portion with Vallejo Model Air Wood (71.077), and then brush on wood grain using Vallejo Model Color Wood Grain (Transparent) (70.828). After that is dry, I will spray on a chipping fluid (MIG Absolute Chipping), and then spray on a lightened black acrylic color to replicate the black anti-skid coating. As soon as the lightened black acrylic paint is dry, I will use a dampened paint brush and start chipping the lightened black acrylic paint away from the areas on the cockpit floor where anti-skid coating would have been worn off. This is known as the “hairspray technique” because hairspray was used as a chipping fluid. I have never tried this technique before. The next build installment will in part cover this attempt.
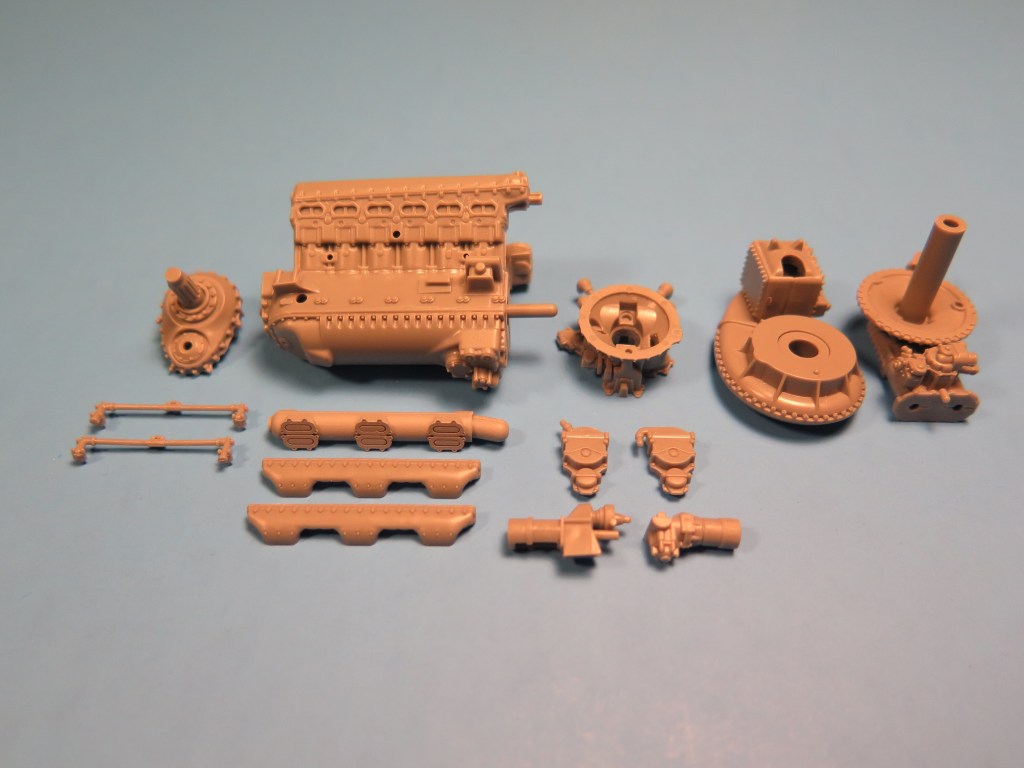
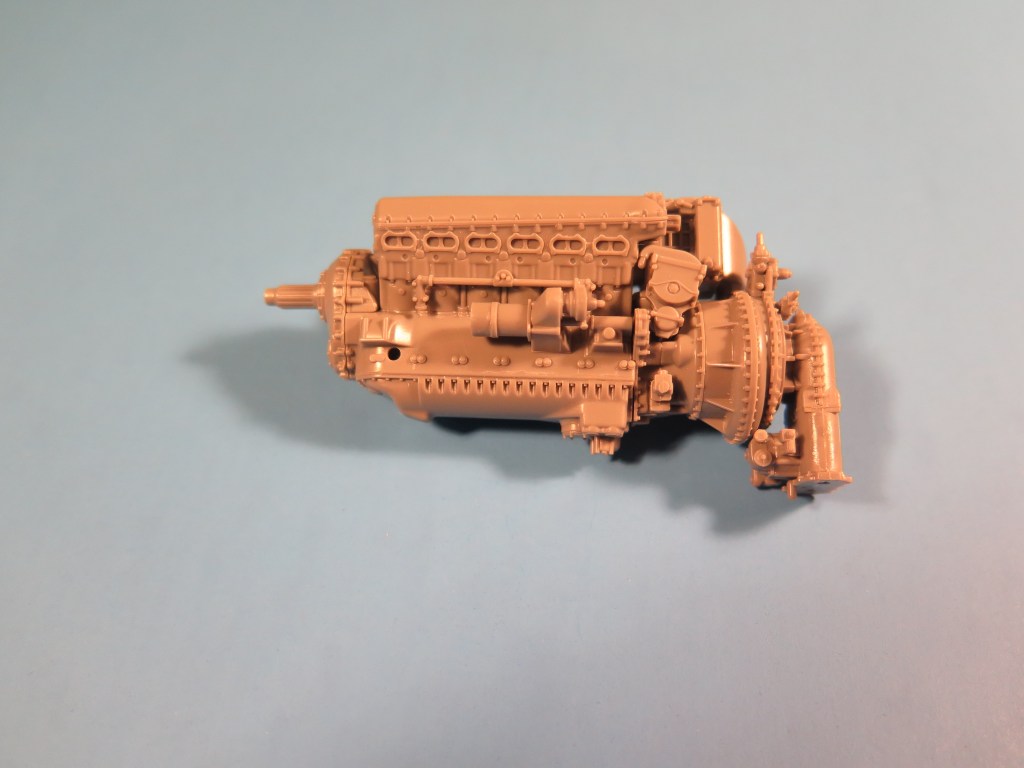
Rolls Royce Merlin Engine – P-51B/C/D/K Mustangs were powered by a Packard built Rolls Royce Merlin V-12 liquid cooled engine. Tamiya did an excellent job of recreating the Rolls Royce Merlin engine in 1/32 scale. With 47 plastic parts, and 3 photo-etch parts, the engine is a kit itself, and looks fantastic when built up. Attention to the assembly instructions is needed as the sprue that contains the engine parts also contains separate parts for the Rolls Royce Merlin engine for Tamiya’s 1/32 Supermarine Spitfire Mk. IX, and using the wrong parts will cause the engine to not fit properly. Below is a picture of the sub-assemblies and additional parts.
To show how well engineered the kit’s engine is, I assembled the sub-assemblies and added the additional parts without glue. It is amazing how well it comes together.
I will paint the various sub-assemblies black and use the Prismacolor Metallic Silver pencil to color all of the exposed nuts, and then finish the final assembly. After a acrylic clear coat, the engine will be weathered to represent use.
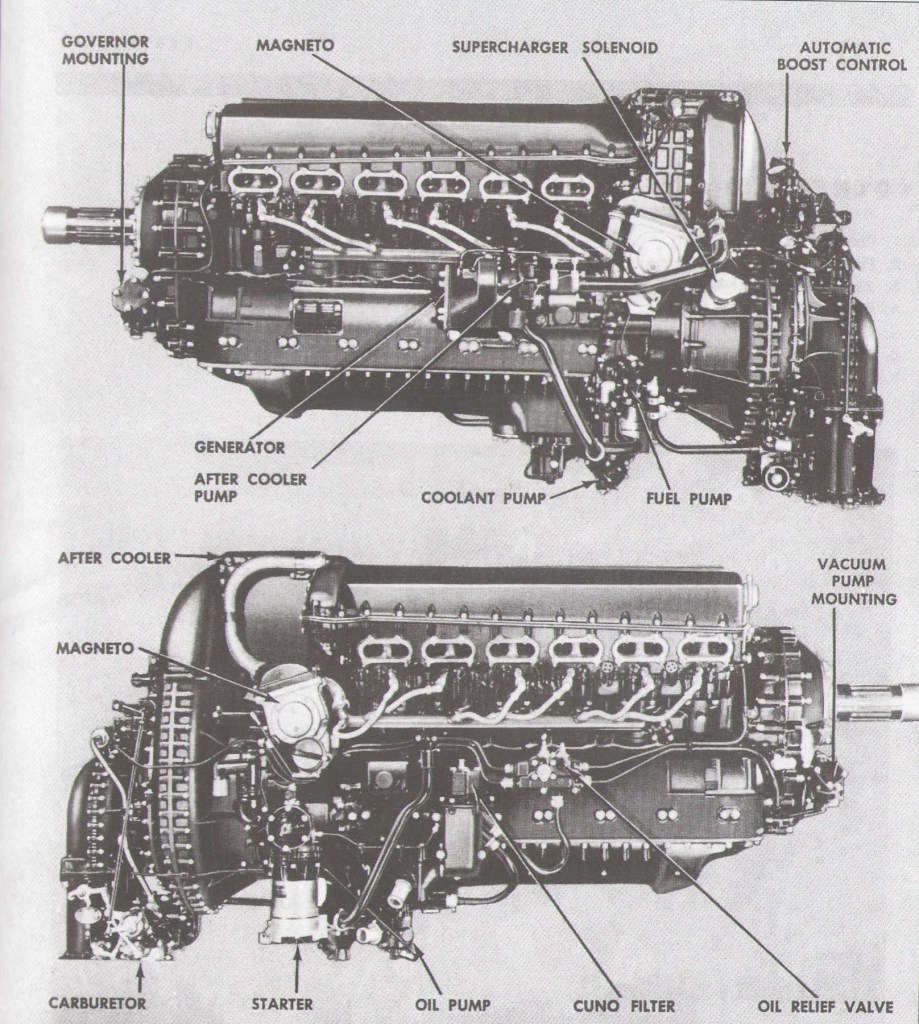
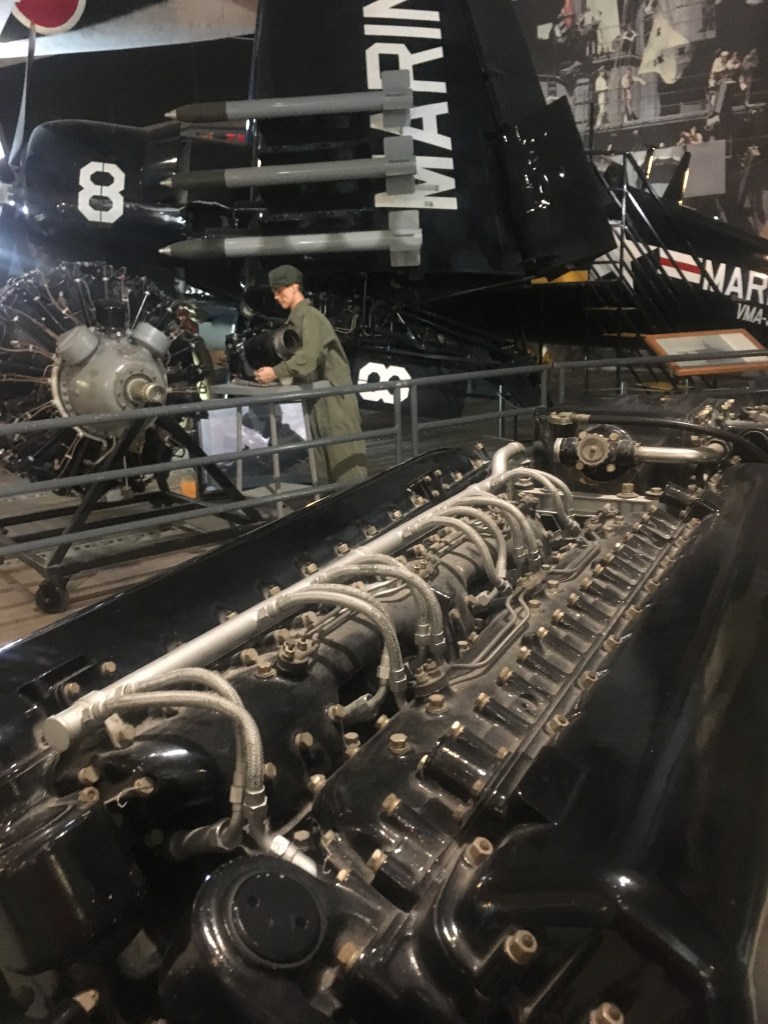
If I have any criticism of the engine, there are a few details missing such as the wiring harness coming off of the magnetos, the spark plug wires, and some of the plumbing. Tamiya did provide locating holes for where the spark plugs are located. Below are pictures of the actual engine showing the missing details. The last picture is of the top of a Rolls Royce Merlin engine at the San Diego Air & Space Museum.
Since the kit’s cowling panels can be removed, I will definitely be adding the wiring harnesses, spark plug wires, and some of plumbing. In the hands of an advanced modeler, the kit’s engine can really be turned into a masterpiece. Kudos to Tamiya!
Next Installment of the Build – Completion of the cockpit floor, final assembly and detailing of the engine, and starting assembly and detailing of the wheel wells. Thanks again for looking in! Comments and criticisms are always welcome.
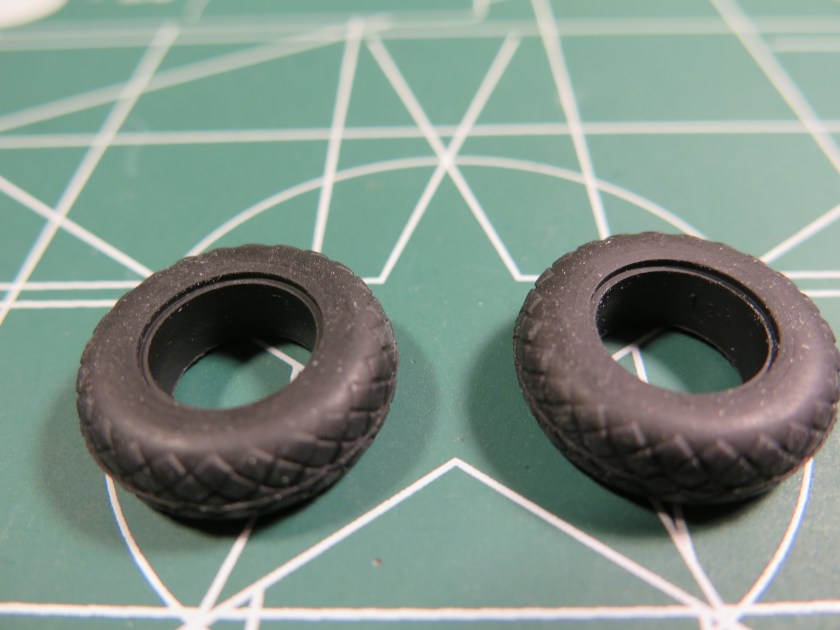
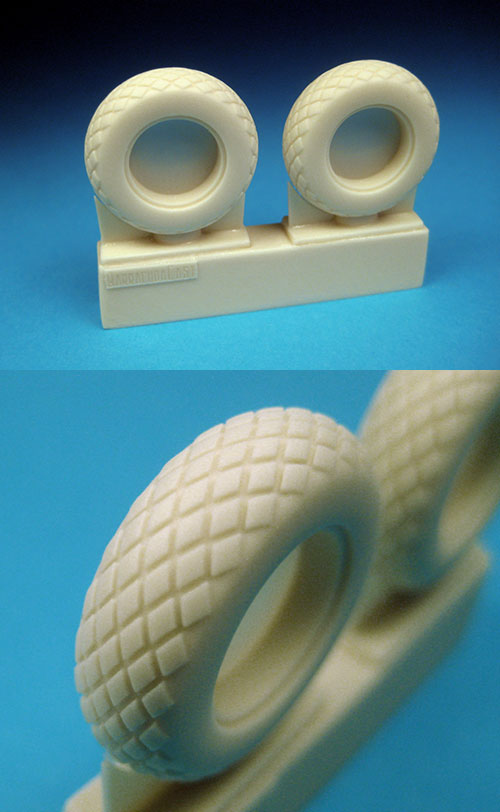
After Market Products – For the most part, this will be an out of the box build. However, I decided to use a few after market products. The first after market product needed is a nice set of resin replacement tires. Tamiya chose to make the kit tires from some form of very durable rubber. Neat idea, but there is rubber flash from the mold seam that runs down the center of the tires. Reading some on-line builds, modelers have expressed frustration with not being able to eliminate the mold seam flash. O.K., so I thought to myself, how hard can this be? So, I broke out a few sanding sticks. Medium sanding stick; no effect. Coarse sanding stick; again, no effect. I turned to my X-acto knife thinking I could either scrap or cut off the mold seam flash. No success in that attempt. Put in a new blade thinking that the blade might be dull. Not any better. In my frustration, my thoughts turned from removing the flash to destroying the tires. Good thing my thoughts did not stay there long.
I am not sure what the chemical composition of the rubber that Tamiya used is, but I can say with absolute certainty that long after you and I are gone from this earth, these tires will still be here without a hint of degradation. In addition, the rubber tires appear to be dust magnets, and they hold on to the dust like there is no tomorrow. My attempts to remove the dust with a brush just moved the dust around on the tires. If you have this kit in your stash and have not built one yet, take my advice and buy a quality set of resin replacement tires. I purchased a set from Barracuda Studios. They are beautifully cast and designed specifically as replacement parts for the Tamiya kit.
Barracuda Studios
After removing the tires from the casting block and washing them in a mild detergent, I primed the tires with Alclad II Grey Primer & Microfiller (ALC 302). This is my primer of choice because it is lacquer based, extremely durable, and provides a good base for color coats to adhere to, especially acrylics. For the tire color, I used Vallejo Model Air Tyre Black (71.315). I really like Vallejo Model Air paints. They spray down beautifully, and I have not had any adhesion problems. I would not recommend spraying them on bare plastic because a primer is necessary to obtain good adhesion. I clear coated the tires with Alclad II Aqua Gloss Clear (ALC 600) because I will be using an enamel wash when it comes time to weather the wheels. The kit rims were primed with Alclad II Grey Primer & Microfiller and then sprayed with Alclad II Aluminum (ALC 101). The red tire slippage tape decals are from the fundekals 🙂 P-51D Mustang Factory Stencil decal sheet.
The other aftermarket products used in this build are BarracudaCals P-51D Cockpit Stencils and Placards to spruce up the cockpit, and as indicated above, fundekals 🙂 P-51D Factory Stencil decals for the exterior of the model.
Instrument Panel – Tamiya’s instrument panel comes in several pieces which includes a clear back piece with raised instrument dials, a decal of the dial faces, and an instrument panel front. The decal is placed on the back of the clear piece, and the then the clear piece is joined with the front of the instrument panel. I painted the instrument panel front with Vallejo Model Air Black (71.057) lightened slightly with Vallejo Model Air White (71.001) (6 to 1 ratio). I don’t like using straight black as I think straight black is very stark. After painting the various switches and bezels, I clear coated instrument panel front with Alclad II Aqua Gloss Clear (ALC 600) to provide a base for the instrument panel stencils and placard decals. These decals are very small and were a test of my patience, but the result looks very good. After to decals were set, I sealed them with Alclad II Klear Kote Matte (ALC 313). After the clear coat dried, I attached the front and back pieces.
The completed instrument panel looks very nice with the stencil and placard decals. A few observations. First, the instrument bezels on the kit instrument panel are so close together in places that the vertical yellow dividing line decal did not lay down very good, and this is after I tried my best to trim the excess decal film away, and used decal solvent solution to get the decal to settle down. Second, the rear clear piece is just too thick to get a good representation of the instrument dial faces. Again, neat idea that just does not work very good. The next Tamiya 1/32 P-51D Mustang that I build, I will replace the kit instrument panel with either Eduard’s pre-painted photo-etch or Look instrument panels.
Next Installment of the Build – Cockpit floor and fuselage fuel tank, and beginning assembly of the kit’s Packard built Rolls Royce Merlin engine, which is a kit in and of itself.
With the release of the Tamiya’s 1/32 North American P-51D/K Mustang “Pacific Theater” kit in 2012, modelers were finally provided with a kit that has almost all of the necessary parts to build an accurate Iwo Jima VLR Mustang. It had been a long time coming. For the most part, kit manufacturers have either been willfully ignorant of the differences between a standard P-51D Mustang and an Iwo Jima VLR Mustang, or completely indifferent. I say willfully ignorant because there is more than sufficient photo documentation regarding the external differences, and on-line resources, such as the P-51 Special Interest Group Forum, to easily document the necessary parts for an accurate kit. In 2005, Hasegawa released an “Iwo Jima” boxing (Kit No. 09664) of their popular 1/48 P-51D Mustang kit, however, it did not have any of the necessary parts to make an accurate Iwo Jima VLR Mustang. In 2014, Italeri released a 1/48 P-51D/K Mustang “Pacific Aces” kit (Kit No. 2743) that included decals for three Iwo Jima VLR Mustangs. While Italeri gets kudos for including decals for the three VLR Mustangs, the actual kit is just a reboxing of the Hasegawa kit.
It appears that Hasegawa’s business model has been to create a kit, and rebox the kit multiple times with different decals with little regard as to whether different or additional parts need to be included. According to Scalemates, Hasegawa has reboxed its 1/48 P-51D Mustang kit a total of 29 times since it was originally introduced in 1991! Not a bad business model if the sole objective is to sell the greatest number of kits with only one mold, but frustrating if you are a modeler who desires accuracy between variants of the same plane. I do not consider myself a “rivet counter”, but the investment of time to get the correct information on an Iwo Jima VLR Mustang is minimal.
It is encouraging to see kit manufacturers like Tamiya raising the bar as far as the level of detail, ease of construction (better engineering), and providing different variants. It was very pleasing to see the parts and decals for an Iwo Jima VLR Mustang in their “Pacific Theater” boxing. The other model manufacturer that is catering to those who desire greater accuracy between variants of the same plane is Eduard. Both their 1/48 Messerschmitt Bf-109 and Focke Wulf Fw-190 lines of kits provide modelers with accurate kits of the variants of those planes. Eduard recently released their first 1/48 kit in their widely anticipated line of P-51 Mustangs, and has made it known that they will be releasing an Iwo Jima VLR Mustang boxing in 2020. I received Eduard’s first release last week, and to my surprise, all of the necessary parts to make an accurate Iwo Jima VLR Mustang are in the kit except for the drop tanks and sway braces. Kudos to Eduard, and I eagerly await their release of the Iwo Jima VLR boxing. Review of the Eduard kit to come later.
The Differences: SCR-695 and Battery Locations. The P-51D Mustangs flown by the 15th, 21st and 506th fighter groups were standard Block 20-NA and 25-NA models to which modifications were made while on Iwo Jima. The first difference was the placement of the SCR-695 IFF transmitter (multi-band airborne transponder which allowed a plane to be identified on friendly radars) behind the standard SCR-522 radio transmitter (4 channel VHF radio set used for air-to-air and air-to-ground communications). This necessitated moving the battery, which was normally located behind the SCR-522 radio transmitter, to the engine compartment. In order to keep the engine compartment cooler, a small air scoop was located on the left side of the fuselage above and in front of the wing leading edge. Also added to the cockpit area behind the pilot’s head rest armor plating was the SA-3/A inertia switch and the BC-727 indicator lights. A small antenna (the AN95-A) was added to the underside of the wing just aft off the right landing gear wheel well.
North American Aviation/Boeing
John Terrell
AN/ARA-8 Homing Adaptor & Uncle Dog Twin Antennae. The most distinctive external feature of an Iwo Jima VLR Mustang was the twin “Uncle Dog” antennae.
Loomis Dean/USAAF/National Archives via Fold3
With the installation of these antennae, the normal single mast antenna was moved under the fuselage just forward of the wheel wells, which can be seen in the lower left corner of the photo below.
Loomis Dean/USAAF/National Archives via Fold3
The twin Uncle Dog antennae were a part of a VHF beacon system that was needed for the long over water flights in order for the VLR Mustangs to find the B-29s they were escorting, and to find their way back to Iwo Jima. The system devised included B-29 navigation aircraft equipped with Uncle Dog transmitters, the VLR Mustangs using their SCR-522 VHF communications set along with an AN/ARA-8 homing adapter, and an MD-34 modulator keying set, and a ground based version of the SCR-522 (SCR-575) operated from Mt. Suribachi on Iwo Jima known as “Brother Agate”. The VLR Mustangs would home in on the B-29 navigation aircraft, not only to form up with the B-29s they were escorting, but the B-29 navigation aircraft were also used on the homeward leg of the VLR missions to guide to Mustangs within a couple hundred miles of Iwo Jima after which the Mustangs would home in on the signal sent from Brother Agate. There is an excellent article on the Uncle Dog/Brother Agate VHF beacon system written by Mark Starin, RMC USNR (Ret.), on the 506th Fighter Group website (http://www.506thfightergroup.org). From the main page, go to the Pilots section, and click on the “VLR Story” page. The article is the second article on the page. Mark Starin is the son of 458th FS, 506th FG pilot 1st Lt. Myndret S. Starin.
John Terrell
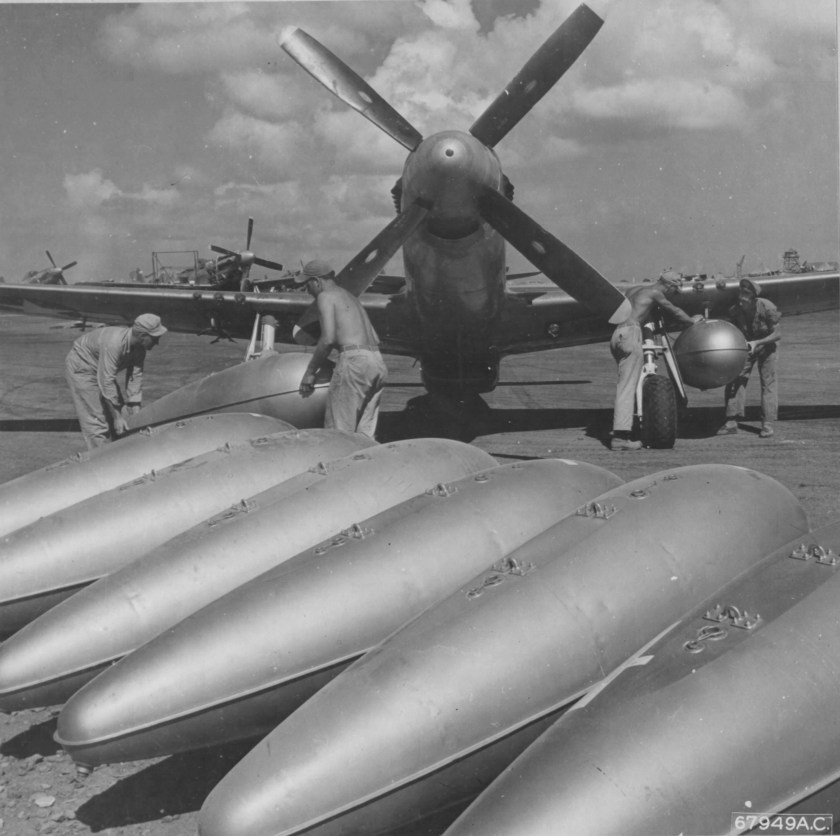
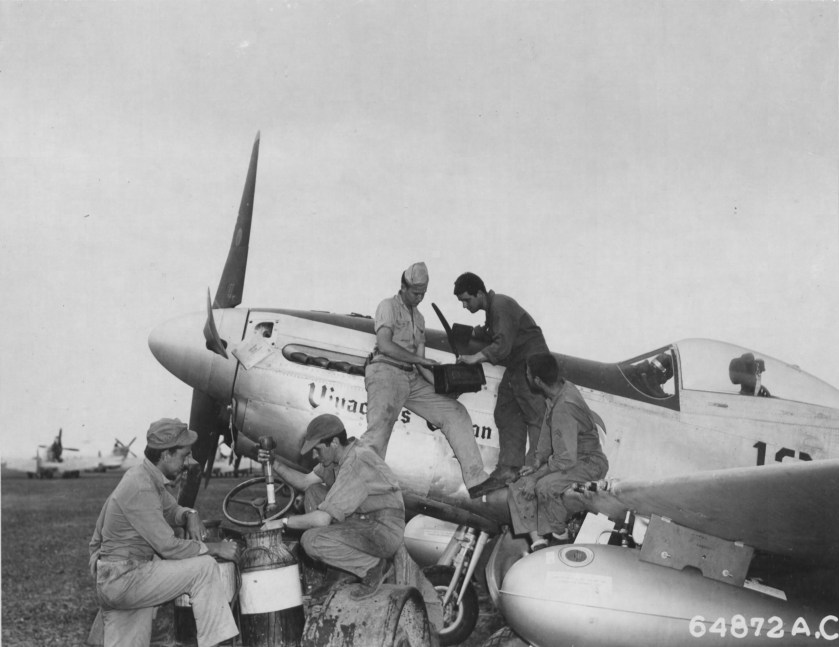
VLR Drop Tanks. Because of the great distance covered on the VLR missions, the Mustangs used two of the larger types of drop tanks: 1) 110 gallon metal drop tanks, and 2) 165 gallon P-38/P-61 style drop tanks. The 110 gallon metal tanks were the standard drop tanks used on VLR missions, and even with these larger tanks, pilots often landed back on Iwo Jima with only a few gallons of fuel left.
Loomis Dean/USAAF/National Archives via Fold3
USAAF/National Archives via Fold3
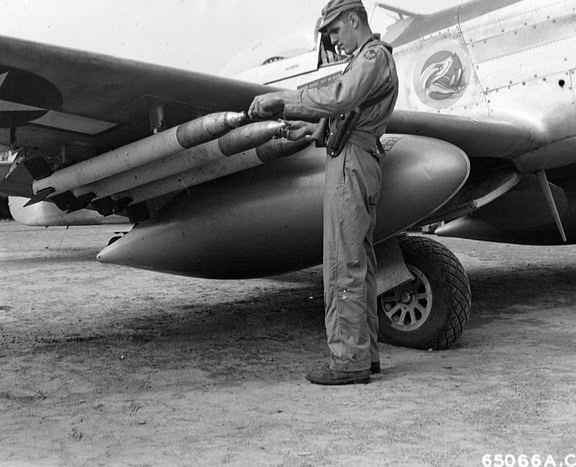
The 165 gallon P-38/P-61 type drop tanks were used on two different types of missions. The first was combat air patrol (CAP) missions around Iwo Jima. The 165 gallon drop tanks allowed the Mustangs to loiter longer. Towards the end of the war, the VLR Mustangs began carrying six HVAR rockets on strike missions, and the 165 gallon drop tanks were used to provide additional fuel due to the extra drag caused by carrying the rockets.
Major James B. Tapp (USAAF/National Archives via Fold3)
Because of the larger size of both drop tanks, sway braces were used. The sway braces were cut from plywood and made to drop from the planes when the drop tanks were released.
USAAF/National Archives via Fold3
Unfortunately, Tamiya did not include the sway braces in their “Pacific Theater” boxing, nor did they include the 165 gallon drop tanks or HVAR rockets. With the Tamiya kit, a modeler is limited to VLR Mustang with the 110 gallon drop tanks out of the box. It is anticipated that Eduard will include both the 110 gallon and 165 gallon drop tanks along with the sway braces in their 1/48 Iwo Jima VLR Mustang boxing.
In 2010, AJ Press announced the release of a book dedicated to the 506th Fighter Group as part of their Fighting Units in Color series. In the process of acquiring the book, “506th Fighter Group: The History of the 506th Fighter Group, Iwo Jima 1945” (more on the book later), I came into contact with the author, Robert J. Grant, who is also the webmaster for the 506th Fighter Group website (http://www.506thfightergroup.org) and one of the Group’s historians. Robert has been a very good friend over the years.
Robert’s father, Captain John J. Grant, was a pilot in the 462nd Squadron, and was initially assigned to 615 “My Bonnie” (P-51D-20-NA, Serial No. 44-72581) along with 1st Lt. Francis L. Lee. It was the practice of the 506th FG to assign two pilots to a plane due to the duration and distance flown on missions, assuring that a pilot would have time to recuperate after flying a 7 to 8 hour mission and would not have to fly back to back missions. Towards the end of war, Capt. Grant flew several missions in 607 (P-51D-25-NA, Serial No. 44-72861). It is believed that Captain Grant was reassigned to 607 upon achieving the rank of captain, but unfortunately, the unit histories of both the 506th Fighter Group and the 462nd Fighter Squadron do not go into that level of specificity. It it is also believed that 2nd Lt. Howard E. Miller was assigned to 607.
Captain John J. Grant (Loomis Dean/USAAF/National Archives via Fold3)
Captain Grant, known as “JJ”, was one of the “old men” of the 462nd Squadron relatively speaking. Born on February 28, 1915 in Marshall, Oneida County, New York, JJ was 27 years old, had graduated from Syracuse University, and had been in his chosen career field of physical education and athletics for several years when he enlisted on March 11, 1942. He was assigned to the 506th FG shortly after the fighter group’s activation on October 21, 1944. The 506th was trained specifically to fly VLR missions before arriving on Iwo Jima, and between May 28, 1945, and August 14, 1945, flew a total of 29 VLR missions from Iwo Jima to Japan and back. While mission reports do not list pilots who flew on a mission, Robert believes his father completed at least 12 VLR missions.
After the war, JJ returned to teaching physical education and coaching, and had a very successful career as a high school football coach and athletic director. He taught physical education in Greene, Auburn, and Rome, New York high schools. He ended his career in education as the Director of Health, Physical Education and Athletics with the Schenectady City Schools, retiring in 1972. Before retirement, he also served as the President of the New York State Athletic Association. JJ was also instrumental in organizing the first reunion of 506th Fighter Group veterans in 1985, and organized many of the reunions thereafter. Captain John J. Grant passed away on December 23, 2003, at the age of 88, in Melbourne, Florida.
Loomis Dean/USAAF/National Archives via Fold3
The photo above is the best picture of 607 in existence. The photo shows no nose art on the right side of the nose, but does show a name on the right side canopy sill. When the picture is enlarged, the name looks like “RITA II”, however, it is difficult to make out the exact name. I was unable to find a picture of 607 showing nose art on the left side of the nose.
On July 7, 2012, the Planes of Fame Air Museum in Chino, California, held a symposium on the Iwo Jima VLR Mustang Groups. Presenting at the symposium were Robert J. Grant and 506th FG, 462nd FS pilots 1st Lts. William G. Ebersole and Edward Linfante. At the end of the presentations, the Air Museum unveiled that it had repainted one of its P-51D Mustangs as 607 ‘Dolly’. Below is Robert J. Grant with the warbird 607 ‘Dolly’ holding artwork by Zbigniew Kolacha.
Robert J. Grant
For this build, I will be using Tamiya’s 1/32 North American P-51D Mustang. Released several years ago, the kit is in a class by itself and is the most accurate Mustang kit in any scale. Tamiya released a second boxing of the kit which focuses on P-51D/K Mustangs flown in the Pacific Theater of operations.
This kit has almost all of the parts to build an accurate Iwo Jima VLR Mustang (correct avionics equipment, twin Uncle Dog antenna, relocated single antenna mast on the underside of the fuselage forward of the wheel wells, relocated battery in the engine compartment, and 110 metal drop tanks). Unfortunately, the kit does not provide decals for any 506th Mustangs. The only decals of an Iwo Jima VLR Mustang in the kit are those of the top VLR ace, Robert “Todd” Moore’s “Stinger VII” (45th FS, 15th FG). Since there are no commercially available decals for 607 ‘Dolly’, I had custom decals for the plane name (‘Dolly’), the plane number (607), and the serial number (472861) made by Mark Tutton of Starfighter Decals at www.starfighter-decals.com.