Kits-World produces a decal sheet (KW172225) which includes the markings for Dinah Might. The other markings included on the decal sheet are for a 482nd BS/505th BG B-29 Bad Medicine.
Kits-World Decals
As you can see, the art work for both sets of markings is excellent and consistent with photos of each plane. In addition, the printing of the decal sheet is very well done and in register. A complete set of national insignia are provided for one plane.
Kits-World Decals
Kits-World has produced some excellent decals for B-29s in both 1/72nd and 1/48th scale. Check them out at: https://www.kitsworld.co.uk/index.php?JSTONE=1. You can purchase the decals directly from Kits-World or from many fine on-line retailers. Kudos to Kits-World!
UpRise Decals from St. Petersburg, Russia has released decal sheets featuring two 457th Fighter Squadron, 506th Fighter Group North American P-51D-25-NA Mustangs in 1/72nd, 1/48th, and 1/32nd scales.
UpRise produces decals for both World War II and modern military aircraft, civil aircraft and airliners, helicopters, ordinance, and insignia. Their website can be found here: https://uprise-decal.ru/
UpRise Decals
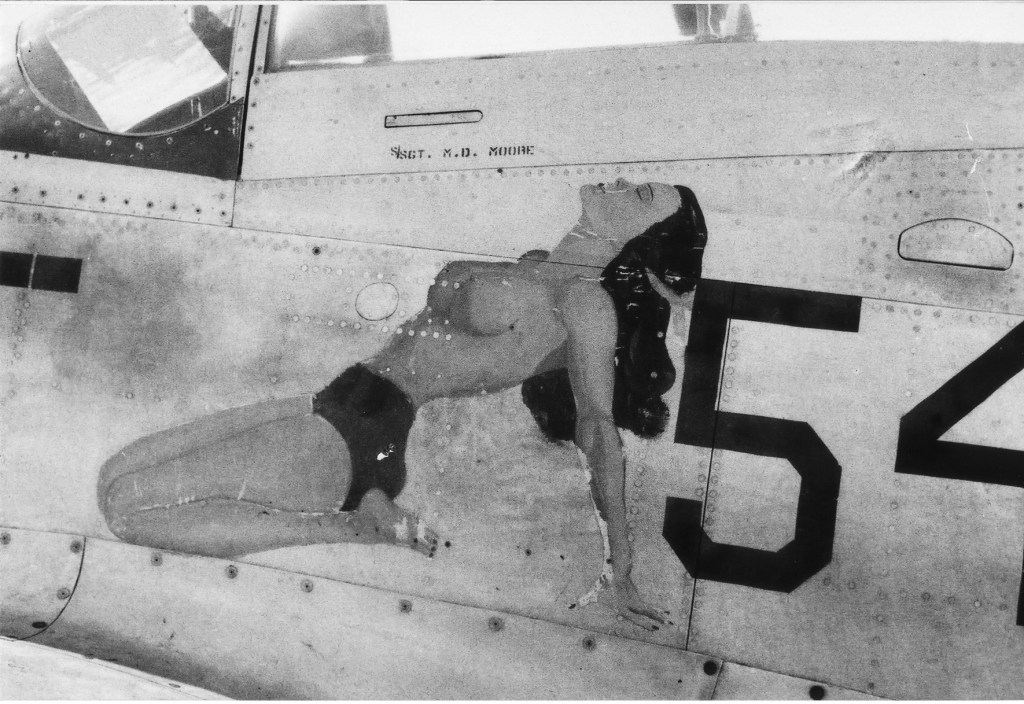
Decals are provided for 542 “Fighting Lady” (Serial No. 44-72570), and 528 “The Enchantress” (Serial No. 44-72671). Both of these planes are popular among modelers because of the pin up art which adorned their fuselages.
The decals are lazer printed and look exceptionally good, and each sheet comes with the dive angle stripes that appeared on the leading edge of the top of the wings and most of the exterior stencils that appeared on 506th FG P-51D Mustangs. The extensive exterior stencil decals are a nice nice touch on UpRise Decals’ part.
UpRise DecalsUpRise DecalsUpRise Decals
528 “The Enchantress” was assigned to 2nd Lt. William E. Saks. 2nd Lt. Saks went Missing in Action on the infamous June 1st “Black Friday” escort mission to Osaka in which 27 Mustangs and 24 pilots of the 15th, 21st and 506th Fighters Groups were lost to severe weather conditions encountered between Iwo Jima and the Japanese Home Islands. His Missing Air Crew Report indicates that he was flying a different P-51D-25 Mustang (Serial No. 44-72885) on that mission. The Enchantress survived the war and was transferred to Japan as part of the occupation forces after the cessation of hostilities.
528 “The Enchantress” (506th Fighter Group Association)
It is unknown if a second pilot was assigned initially to fly The Enchantress along with 2nd Lt. Saks, and if any other pilots were specifically assigned to the plane after 2nd Lt. Saks was lost on June 1st. We are unable to locate an individual picture of 2nd Lt. Saks, or a group picture that includes him. The picture below is of Dr. Theodore Paprocki, the 457th squadron’s medical officer, sitting on the wing of The Enchantress. Note the wear of the paint on the back sides of the propeller blades (uncuffed portions) due to the sand and volcanic ash on Iwo Jima.
Dr. Theodore Paprocki sitting on the wing of “The Enchantress (506th Fighter Group Association via Maurita Paprocki)
The other decals are for 542 “Fighting Lady” which was assigned to 1st Lt. Ralph Gardner and 1st Lt. Chester Jatzcak. Below is a nice close up picture of the pin up art that adorned the fuselage.
542 “Fighting Lady (506th Fighter Group Association)
While the quality of the below photo is not the best, it does clearly show the position of the name “Fighting Lady” on the nose below the engine exhaust stacks and the elegant design of the Mustang’s nose.
Unknown ground crew member lying on the wing of “Fighting Lady” (506th Fighter Group Association)
Norma Jatczak, 1st Lt. Chester Jatczak’s wife, was of the belief that the plane’s name was “Broadway Gal”. Unfortunately, the 506th Fighter Group Association does not have a photo to substantiate her belief.
1st Lt. Chester Jatczak crouched on the wing of “Fighting Lady” (506th Fighter Group Association via Norma Jatczak)
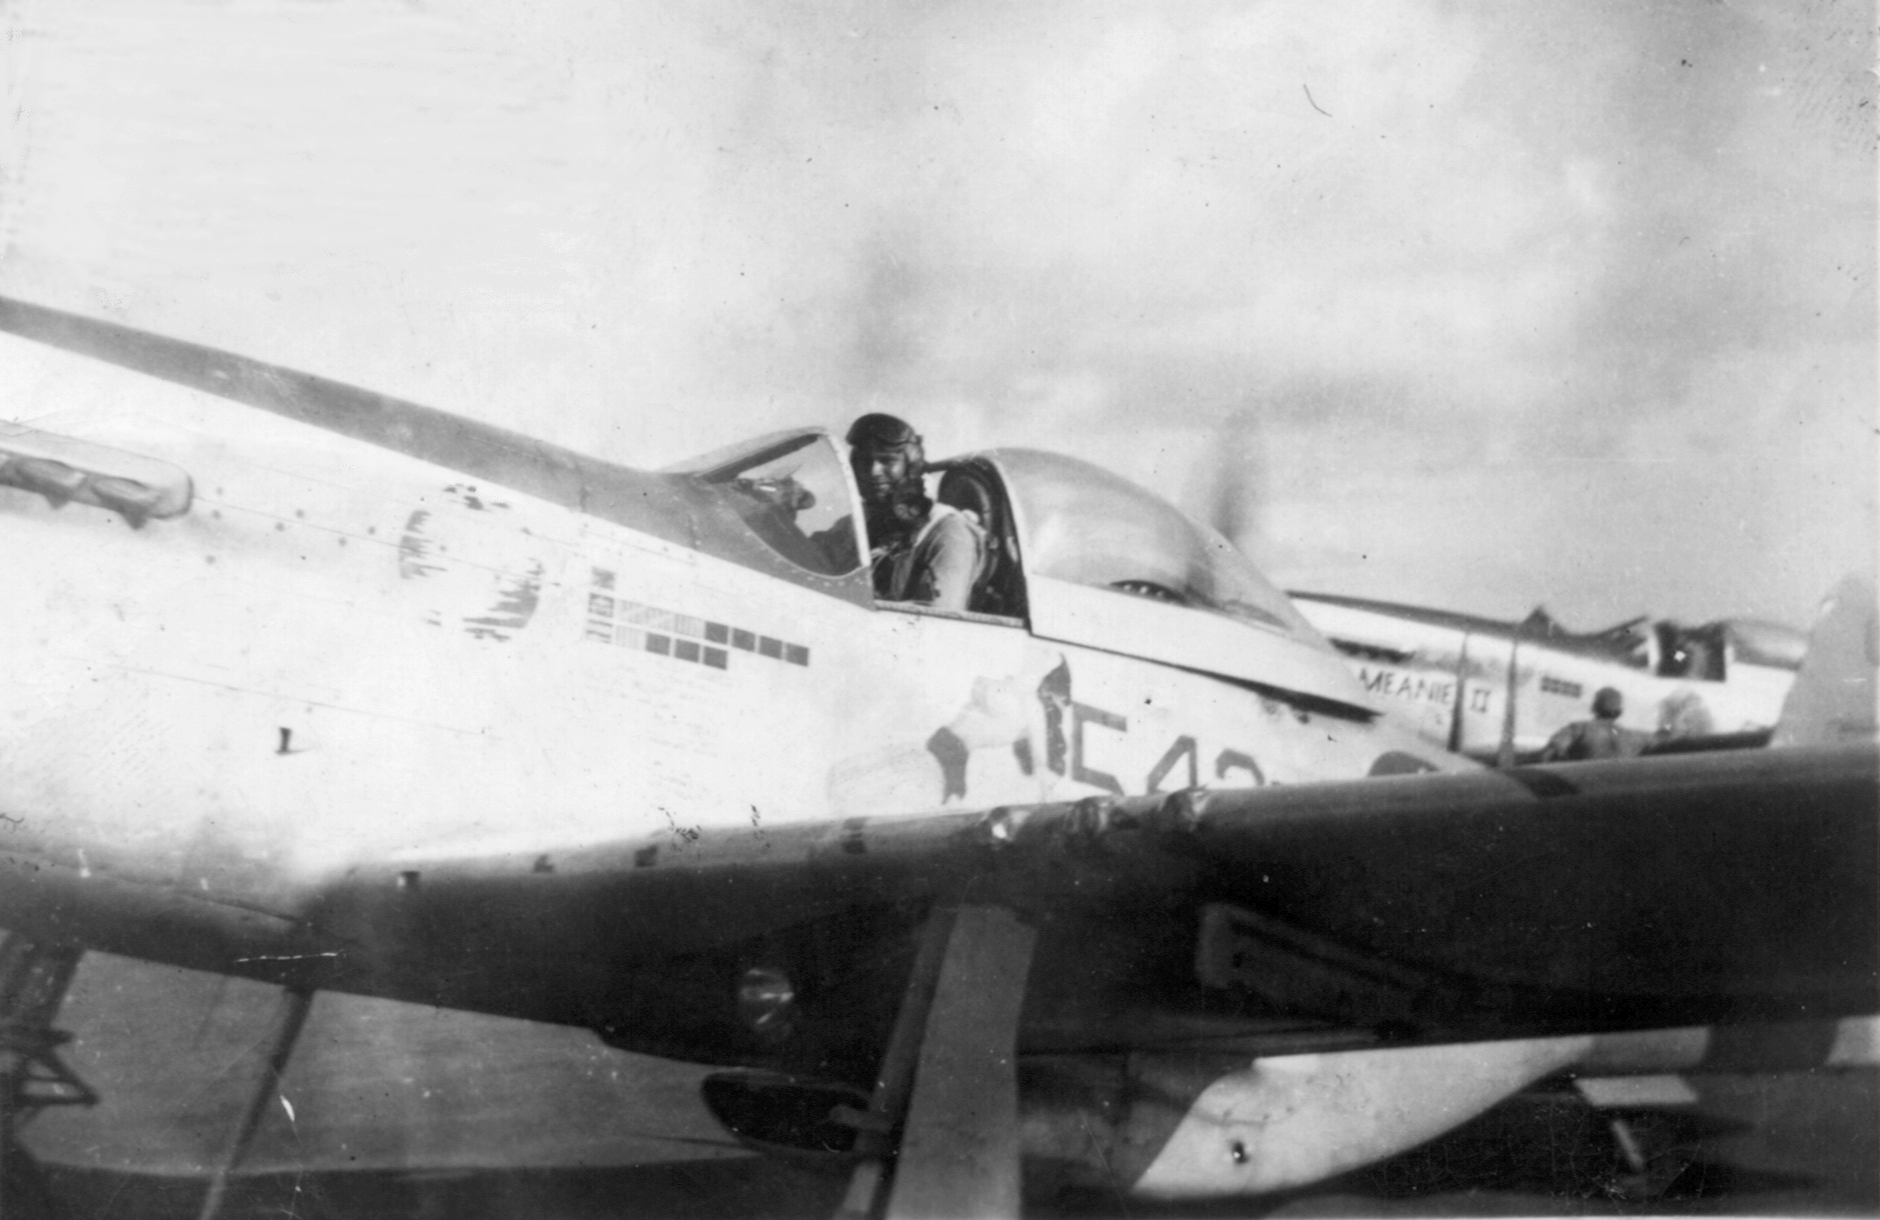
Please note the photo below does not have the name “Fighting Lady” on the nose yet. This photo was likely taken in June of 1945 as the plane has a solid green tail instead of the initial squadron markings of diagonal green stripes on the tail.
1st Lt. Ralph Gardner in the cockpit of “Fighting Lady” (506th Fighter Group Association)
I interviewed Ralph Gardner at the 2013 506th Fighter Group Reunion in Chino, California, but did not think to inquire about the whether the plane had the name of “Broadway Gal” at one point in time, or whether the name was on the right side of the nose. The photo below appears to dispel the notion that “Broadway Gal” appeared on the right side of the nose.
1st Lt. Ralph Gardner flying “Fighting Lady (506th Fighter Group Association)457th Fighter Pilots in front of “Fighting Lady” – Front row left to right; Lts. Alan Kinvig and George Hetland; Back row left to right; Lts. Ray Miller, Martin Ganschow, Ralph Gardner and Larry Grennan (506th Fighter Group Association via Ralph Gardner)
UpRise Decals uses Film Free Ability (FFA) for their decals. This is the technology that allows the modeler to remove the clear film that covers the decal during production. The initial application of FFA decals is the same as regular water slide decals. After applying the decals, whisking away the excess water, and working out any air bubbles from under the decals, you let the decals sit for 24 hours, and then gently remove the film that covers the decals. Without any film surrounding the decals, they look like they are painted on. Really nice!
A tutorial/description of UpRise Decals’ Film Free Ability decals is found here: https://uprise-decal.ru/ffa. There are also several YouTube videos providing tutorials on how to use these and similar decals from other manufacturers.
UpRise Decals can be purchased on eBay from two vendors who appear the be the same person. When I initially purchased these decals, the FFA was only available on their 1/32nd decal sheets, but now all their decals (1/144th, 1/72nd, 1/48th, 1/32nd and 1/24th) produced from November 2022 forward use the FFA technology. If you want to use UpRise’s FFA decals, you need to check to make sure that the particular decal sheet you are buying has the FFA technology. There are probably some the regular water slide decals still being sold or resold on eBay.
The thought of using a paint brush to hand paint the details on a 1/48th scale instrument panel has just never appealed to me. I am assuming I could do a decent job, but maybe I just lack the patience for that work. Kit supplied decals for the instrument panels, at least for me, have never quite looked the part.
So, thank goodness for Eduard, and other companies, that continue to provide innovative products to help modelers increase the level of detail and realism of model cockpits. This will be a quick comparison of Eduard’s photoetch, LooK, and Space instrument panels for Eduard’s 1/48 P-51D Mustang.
Eduard’s Pre-Painted Photo Etch Instrument Panel: My first experience with a photo etch instrument panel came from Eduard’s photo etch set for Academy’s 1/72 Consolidated PBY-5A “Black Cat” Catalina kit. It was an unpainted brass instrument panel front and a clear piece of acetate with the dial faces painted on. I painted the brass front black and sealed it with clear coat, and then sandwiched the clear acetate between the painted instrument panel front and a white piece of plastic card stock cut to the shape of the instrument panel. It was finished with a small drop of Microscale Industries Micro Kristal Klear in each dial to simulate the glass. It was definitely a step up in appearance from just slapping the kit supplied decal on the instrument panel kit piece.
Now we have exquisitely pre-painted photo etch frets that come with all of the pieces to make a highly detailed instrument panel. The main portion of Eduard’s photo etch instrument panel in their P-51D Mustang kit comes in three pieces that are sandwiched together. Eduard has developed the technology to simulate the glass covering the dials on the middle piece so that you no longer need to use Micro Kristal Klear to simulate the glass. Very nice touch. Eduard’s photo etch frets that come in the Profipack boxings also come with seat belts, other cockpit pieces, and some exterior pieces.
Eduard 1/48 Photo Etch Parts from the “Very Long Range: Tales of Iwo Jima” Kit
The downside to using these pre-painted photo etch sets is that there are numerous small pieces that are difficult to handle and to get in place. Although I enjoy using photo-etch update sets, the smaller pieces can really test one’s patience.
Eduard’s LooK Instrument Panel: Eduard’s “LooK” instrument panels are cast in black resin with colour printed dials, bezels, switches, knobs and more. The benefit of these products is that they take very little time to separate from their casting block, clean-up and assemble. No painting, no little photo etch parts to attach, and they are drop fit replacement parts for whatever kit they are made for. The standard LooK package also come with Eduard’s pre-painted steel seatbelts. Eduard also produces a LooK Plus version that comes with resin pieces such as exhaust stacks, tires, etc. . .
Eduard 1/48 P-51D-15+ LooK Instrument PanelPhoto Etch Seat Belts that are included with LooK Instrument Panel
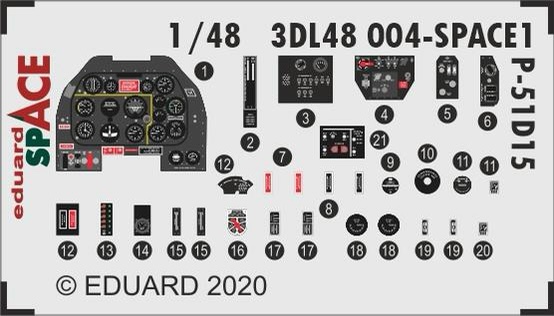
Eduard’s Space Instrument Panel: The Eduard Space product line are 3D instrument panels on decal sheets. These are decals that show actual relief of the instrument dial bezels, switches, toggles, etc . . . The sets not only come with the instrument panels, but also other cockpit details, and a fret of photo etch seat belt parts and levers.
Photo Etch Fret that is included with Space 3D Instrument Panel
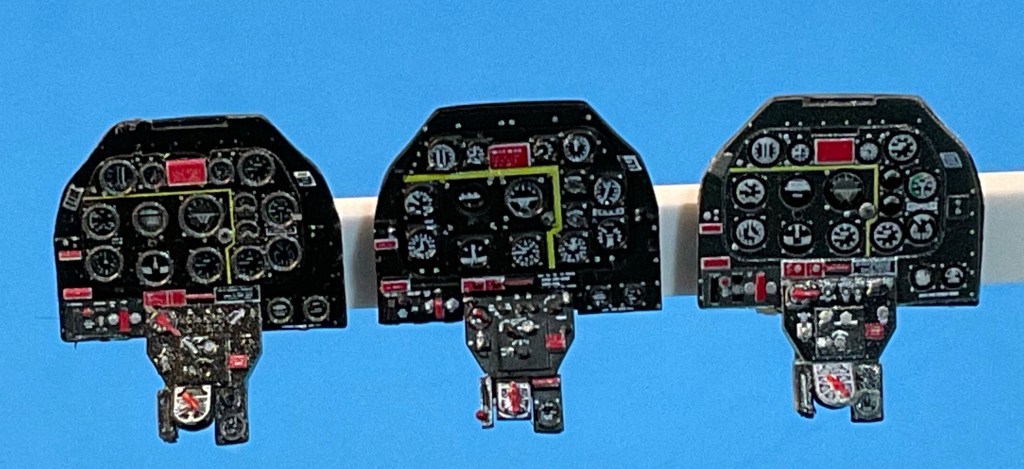
Below are the finished instrument panels with the photo etch instrument panel on the left, the LooK instrument panel in the middle, and Space instrument panel on the right. All three look very nice.
My preference is the photo etch instrument panel due to the quality of the bezels around the instrument dials. To me, they just make the photo etch instrument panel more realistic, but I would have no problem using either the LooK or Space instrument panels. The Space instrument panel took about the same amount of time to create as the photo etch instrument panel did. If you are looking for a great looking instrument panel with the least amount of work, then the LooK instrument panel is your choice.
Comments regarding what your preferences are, and your likes and dislikes about these products are welcome!
Kudos to Eduard for continuing all three product lines, and giving modelers choices. I highly recommend all three products.
Next up: A review of new decals for 457th Fighter Squadron, 506th Fighter Group Mustangs from UpRise Decals.
The good folks at Brengun recently released a set of 1/72nd resin 110 gallon drop tanks with photo etched detail parts and decals. Brengun is a Czech model manufacturer known for its extensive line of photo etch and resin update sets for airplane models. Brengun also produces airplane kits in 1/144th, 1/72nd and 1/48th scales.
I was very excited to learn of Brengun’s release and purchased a set off of eBay for this review. To my knowledge, no kit or aftermarket manufacturer has produced an accurate set of 1/72nd scale 110 gallon drop tanks previously.
Brengun
The drop tanks are beautifully cast with the correct details. The photo etch fret include the sway braces, the flat metal pieces that sit across the tanks and hold the sway braces in place, and the fuel filler caps. For those small pieces, extras are provided in case of loss to the carpet monster. Nice touch on Brengun’s part. The decals are accurate for the markings on the tank, and again, extras are provided.
The set comes with a small instruction sheet that shows the correct placement of the decals and photo etch parts. More importantly, the instruction sheet shows the placement of the photo etch parts to achieve a correct installation of the sway braces. Test fit everything before installing the sway braces to determine the best placement for the model you are building.
Brengun
Below are two USAAF photos showing the correct placement of the sway braces and the front metal piece that holds the sway braces in place.
USAAF/National Archives via Fold3USAAF/National Archives via Fold3
Brengun has some CAD drawings of the tanks with the sway braces on their website, but do not rely on these drawings as they fail to show the correct placement of the sway braces. Rely on the instruction sheet for the correct placement of the sway braces.
It did not take long to remove the casting blocks and clean up the area where the pour stubs are located. There are a few pin holes that will need to to filled around the area of the pour stubs as can be seen in the photos below, but nothing cannot be filled easily and sanded quickly.
As can be seen in the photos above, the detail that represents the rim that goes around the entire tank was missing at the front on one of the tanks where the pour stubs were located. The other tank was fine. This is a quick fix with stretched sprue, and to be truthful, it is hard not to damage that detail when removing the pour stubs and cleaning up the front end of the tank.
Below is a photo of one of the tanks with the pin holes filled and sanded, and the missing/damaged detail repaired with stretched sprue.
These tanks are accurate in shape and detail. With the addition of the photo etch sway braces, they look every bit the part. If you have an Academy, Airfix, Hasegawa, Hobby Boss, Revell, or Tamiya 1/72nd scale P-51D Mustang and want to build a Iwo Jima VLR Mustang, you no longer have to settle for a kit’s 75 gallon drop tanks which were not used by the Iwo Jima VLR Mustang Groups. Highly recommended. Kudos to Brengun!
A superb follow-up on Brengun’s part would be an accurate set of 165 gallon drop tanks with sway braces in 1/72nd scale.
Next up: Squadron markings for the 47th Fighter Squadron, 15th Fighter Group.
In keeping with their initial business model of releasing 1/72 single engine fighters, the good folks at Arma Hobby have recently released a Nakajima Ki-84 Hayate (Frank).
Tamiya, Revell and Hasegawa have all released 1/72nd Ki-84s, but these kits are decades old. The Hasegawa kit is still being produced, and while it is a nice kit, it has raised panel lines, a very basic cockpit without a lot of detail, and a one piece canopy. Sword released a Ki-84 in 2008, and a pre-production version in 2010, but these are limited run kits that are no longer being produced. So it is nice to see a new tool Ki-84 in 1/72nd scale.
As of the date of this post, Arma Hobby has released two boxings of this kit; an Expert Set (with photo-etch parts and masks), and a basic model kit. It is customary for Arma Hobby to release at least two boxings of each kit, so it will be interesting to see if they release another boxing.
Arma Hobby
There are three sprues included in the basic model kit; one with the fuselage, wing, engine, cockpit, and undercarriage parts; one with the horizontal surfaces, drop tanks and bomb parts; and one with the clear parts.
The level of detail in the cockpit is exceptional, and the designers have done a great job keeping the cockpit components to scale. This makes for very delicate parts in which great care is needed when removing them from the sprues and cleaning the parts up. All of the great detail can be showcased since the canopy can be posed open.
The surface detail on the kit is also very nice.
The canopy parts are thin and crystal clear.
As indicated above, the Expert Set comes with a photo etched fret that includes the engine wiring harness, seat belts, and cockpit parts. The masks for the canopy and wheels are made of kabuki tape instead of vinyl.
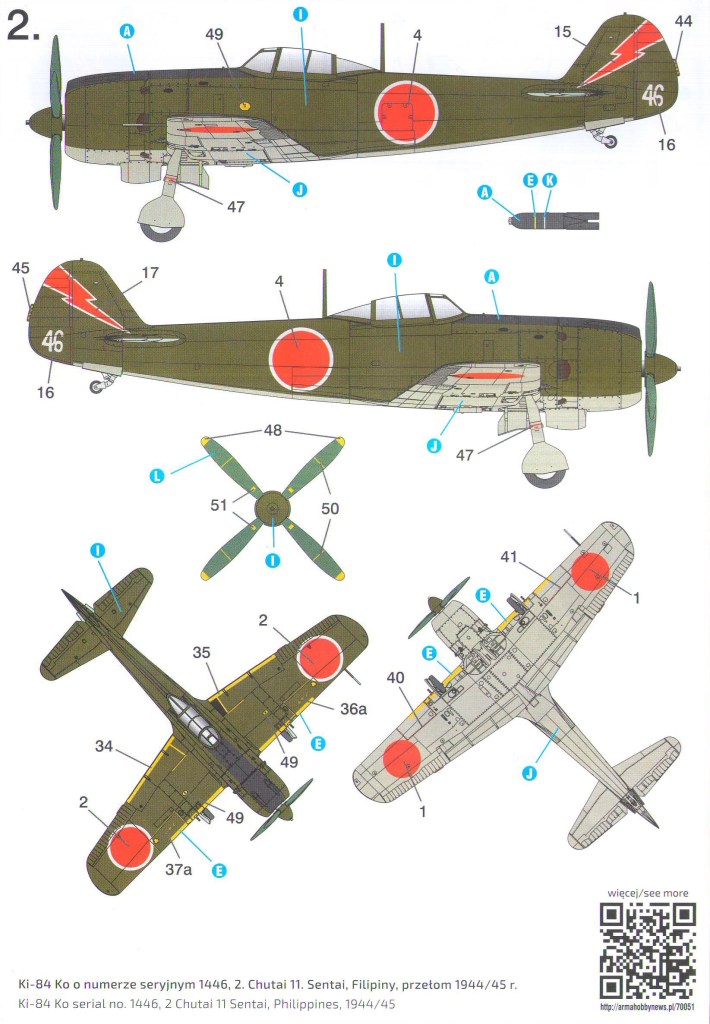
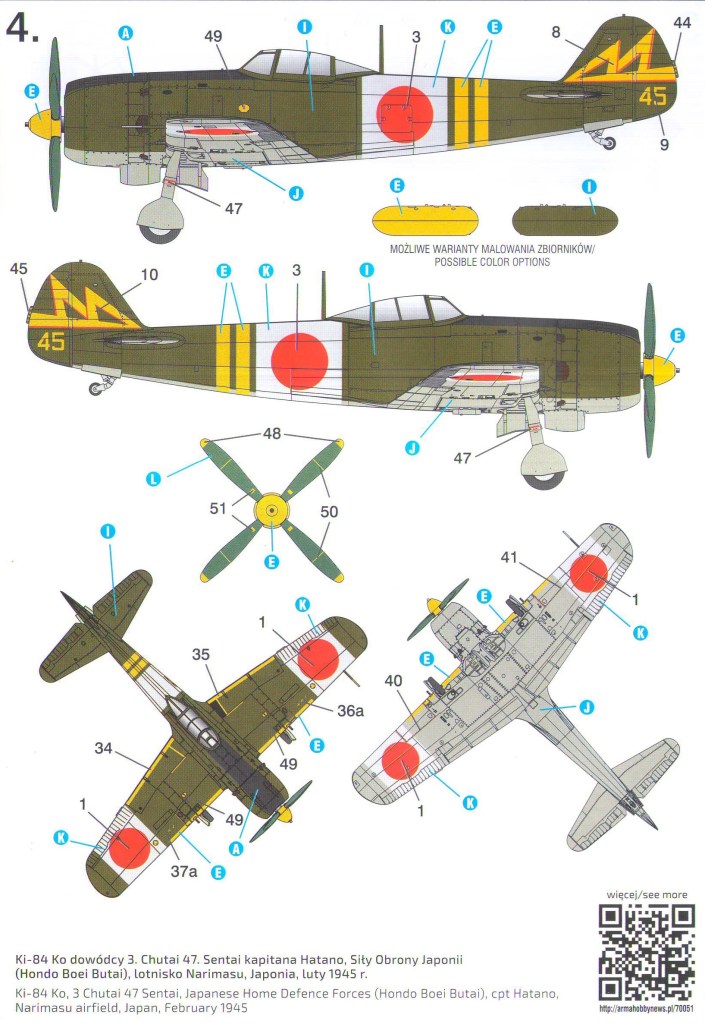
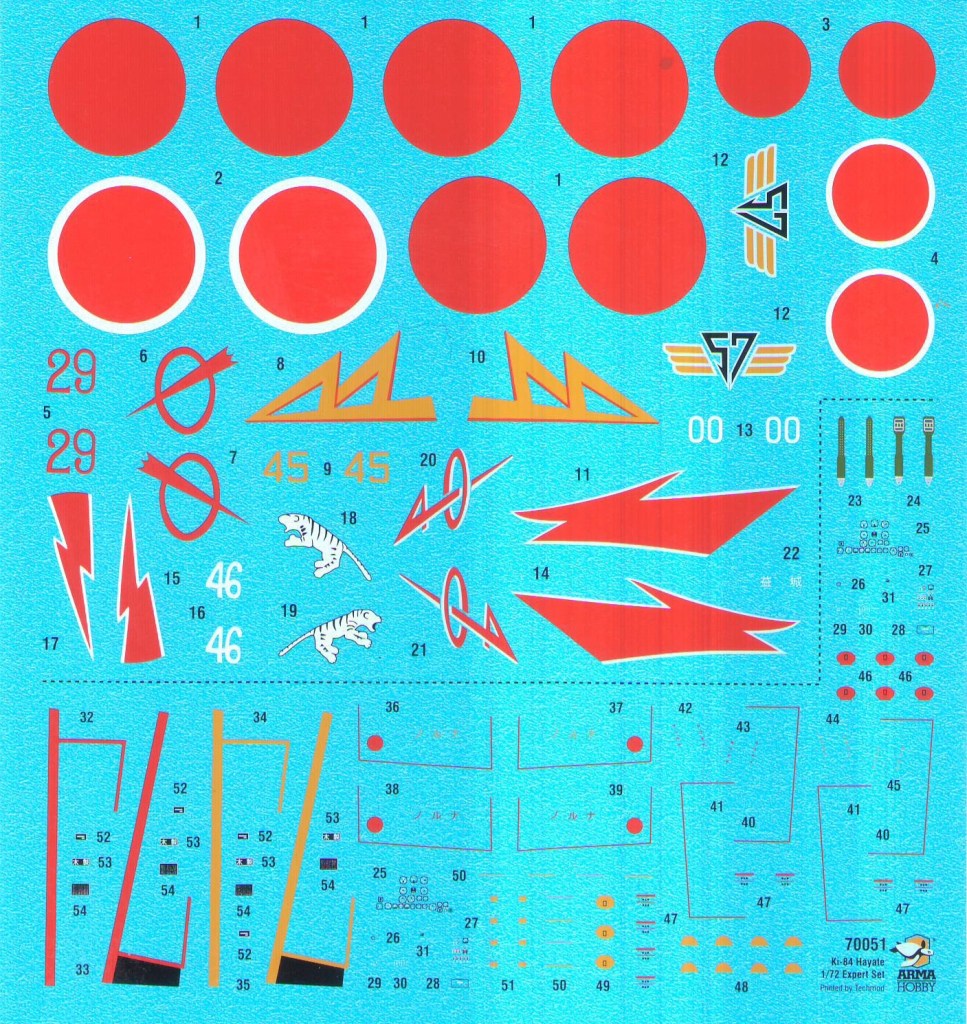
Six decal options are included in the Expert Set, which allows the modeler to choose between Home Defense Hayates, a Philippine based Hayate, and CBI based Hayate, and a kamikaze (57th Shimbu-tai). The decals are printed by Techmod.
Arma HobbyArma HobbyArma HobbyArma HobbyArma HobbyArma HobbyDecals in Expert Set (Arma Hobby)Arma Hobby
The basic model kit provides two decal options; one Home Defense Hayate and a Philippine based Hayate
Arma HobbyArma HobbyDecals in the basic Model Kit (Arma Hobby)
This looks to be another great kit from Arma Hobby. If you would like to see some built up models, please visit Arma Hobby’s website https://www.armahobby.com/. They have an excellent blog that not only shows built models, but also features articles focusing on the history of the planes included in their kits. Very cool.